2014年1月30日 星期四

ASP.NET MVC 4 WebApi 遇到 「 已經開啟一個與這個 Command 相關的 DataReader,必須先將它關閉。」的解決方案

今天在寫 ASP.NET MVC 4 WebApi 撰寫 Controller 時,遇到以下錯誤:


已經開啟一個與這個 Command 相關的 DataReader,必須先將它關閉。

程式碼如下:
IEnumerable<BASE_Field> base_field = db.BASE_Field.Include(x => x.FieldLanguage).AsEnumerable();
IEnumerable<COMP_FieldSetting> comp_fieldsetting = db.COMP_FieldSetting.Include(x => x.Field).Include(x => x.FieldSettingLanguage).Where(x => x.Company.CompanyId == companyid).AsEnumerable();

BASE_Field 關聯 COMP_FieldSetting 為一對多的關係,我本想撈出 BASE_Field 所有資料再將 COMP_FieldSetting 資料塞進去,所以將兩份完整資料先撈出來再做處理,以減少對資料庫下指令的次數。

但是如果再用 COMP_FieldSetting 去做 Where 指令:
foreach ( BASE_Field _field in base_field )
{
    _field.FieldSetting = comp_fieldsetting.Where(x => x.Field.FieldId == _field.FieldId);
}

就會發生錯誤,原因是「Entity Framework 內部是使用 DataReader 作資料存取,所以如果呼叫 where,就會發生錯誤」

解決方法有二:

1. 設定 ConnectionString 加上 MultipleActiveResultSets = true,但只適用於SQL 2005以後之版本。 ( 此方法我沒試過 )
2. 先讀出放置在 List 中,所以程式碼改調整為:

List<BASE_Field> base_field = db.BASE_Field.Include(x => x.FieldLanguage).ToList();
List<COMP_FieldSetting> comp_fieldsetting = db.COMP_FieldSetting.Include(x => x.Field).Include(x => x.FieldSettingLanguage).Where(x => x.Company.CompanyId == companyid).ToList();

使用 List 就是他會將資料內容轉換為獨立實體物件,而不再跟 DataReader 有關。

引用:“已有打开的与此 Command 相关联的 DataReader,必须首先将它关闭。”解决方法


2014年1月29日 星期三

ASP.NET MVC 4 WebApi 與 Extjs 的結合 -- 列表 ( List )

在看到這篇教學,請先參考 Visual Studio 2012 安裝 Northwind 資料庫並建立 Entity Framework Database First ( .edmx ) 以及 ASP.NET MVC 4 WebApi 與 Extjs 的結合 -- 基本配置

使用 Extjs 建立 List 表格,在 WebForm 的情況下,利用 GridView 和 ADO.NET 就可以很迅速地建立表格,如果再套用 bootstrap,那就很舒服了。

但是當你表格要自己設計,連資料庫給的資料 ( json 格式 ) 都必須要對好欄位自己擺放,假設今天一個 List 已經很辛苦的寫好了,但是隔天老闆或客戶又要改欄位位置,那一定會叫苦連天,這時,Extjs 強大功能就會體現出來了,只需要變動幾行程式碼就可以達到欄位調換的功能,甚至可以拖曳欄位給使用者更友善的介面。

1.

首先必須要先建立資料來源的模型 ( Model ),名稱定義為 'Model',以下程式碼是以 Employee 表產生的欄位:
// 定義 data model 定義資料欄位 欄位型態
Ext.define('Model', {
    extend: 'Ext.data.Model',
    fields: [
        { name: 'EmployeeID', type: 'string' },
        { name: 'LastName', type: 'string' },
        { name: 'FirstName', type: 'string' },
        { name: 'Title', type: 'string' },
        { name: 'TitleOfCourtesy', type: 'string' },
        { name: 'BirthDate', type: 'date' },
        { name: 'HireDate', type: 'date' },
        { name: 'Address', type: 'string' },
        { name: 'City', type: 'string' },
        { name: 'Region', type: 'string' },
        { name: 'PostalCode', type: 'string' },
        { name: 'HomePhone', type: 'string' },
        { name: 'Extension', type: 'int' },
        { name: 'Notes', type: 'string'},
        { name: 'ReportsTo', type: 'string' },
        { name: 'PhotoPath', type: 'string' },
        { name: 'Country', type: 'string' },
        { name: 'Photo', type: 'auto', },
        { name: 'mappingField', type: 'auto', mapping: 'EmployeeID' }
        // mapping 到 EmployeeID 即值 = EmployeeID  [mapping Ex. mapping Name.FirstName 即取 Name 這個類別裡 First Name 的值]

    ],
})

2.

接著讀取 API 的資料將資料解析成 'Model' 的格式,建立 Ext.data.JsonStore 塞到變數 store。

var store = Ext.create('Ext.data.JsonStore', {
    storeId: 'store',
    model: 'Model', // 指定data model
    //fields: ['EmployeeID', 'LastName', 'FirstName', 'Title', 'TitleOfCourtesy', 'BirthDate', 'HireDate', 'Address', 'City', 'Region', 'PostalCode', 'Country', 'HomePhone', 'Extension', 'Notes', 'ReportsTo', 'PhotoPath', 'Photo'],
    proxy: {
        type: 'ajax',
        url: 'http://localhost:8090/api/Employee',
        reader: {
            type: 'json',
        }
    },
    autoLoad: true, // 自動載入
    listeners: {
        load: function (store, records, options) {
        }
    },

});

3.

設定欄位過濾器 ( 視所需 ),是針對欄位做字串搜尋的功能,若是日期格式就是日期期間搜尋。

日期篩選:

字串篩選:

// 欄位過濾器
var filters = { 
    ftype: 'filters',
    encode: false, 
    local: true, 
    filters: [{
        type: 'boolean',
        dataIndex: 'visible'
    }]
};

4.

設定 toolbar ( 視所需 ),如果有需要整批修改或整批刪除,這裡可以加入。


//建立toolbar
dockedItems: [Ext.create('Ext.toolbar.Toolbar', { 
    dock: 'top', // 置頂
    items: [
        '->', // 靠右
        {   
            //建立button
            xtype: 'button', 
            text: 'toolbarButton',
            handler: function () {
                // 按下後動作
            }
        },
        {
            xtype: 'button',
            text: 'toolbarButton2',
            handler: function () {
                // 按下後動作
            }
        }
    ]
})]

5.

設定讀取不到資料要顯示甚麼文字。


emptyText: 'No Matching Records'

6.

最後,完整程式碼為:

Ext.Loader.setConfig({ enabled: true });
Ext.Loader.setPath('Ext.ux', '/Scripts/ext/examples/ux');

Ext.require([
    'Ext.grid.*',
    'Ext.data.*',
    'Ext.panel.*',
    'Ext.layout.container.Border',
    'Ext.tab.*',
    'Ext.window.*',
    'Ext.tip.*',
    'Ext.ux.grid.FiltersFeature',
]);

Ext.onReady(function () {

    Ext.QuickTips.init(); //加這行 tip 才會顯示

    Ext.define('Model', {
        extend: 'Ext.data.Model',
        fields: [
            { name: 'EmployeeID', type: 'string' },
            { name: 'LastName', type: 'string' },
            { name: 'FirstName', type: 'string' },
            { name: 'Title', type: 'string' },
            { name: 'TitleOfCourtesy', type: 'string' },
            { name: 'BirthDate', type: 'date' },
            { name: 'HireDate', type: 'date' },
            { name: 'Address', type: 'string' },
            { name: 'City', type: 'string' },
            { name: 'Region', type: 'string' },
            { name: 'PostalCode', type: 'string' },
            { name: 'HomePhone', type: 'string' },
            { name: 'Extension', type: 'int' },
            { name: 'Notes', type: 'string'},
            { name: 'ReportsTo', type: 'string' },
            { name: 'PhotoPath', type: 'string' },
            { name: 'Country', type: 'string' },
            { name: 'Photo', type: 'auto', },
            { name: 'mappingField', type: 'auto', mapping: 'EmployeeID' },

        ],
    })


    var store = Ext.create('Ext.data.JsonStore', {
        storeId: 'store',
        model: 'Model',
        //fields: ['EmployeeID', 'LastName', 'FirstName', 'Title', 'TitleOfCourtesy', 'BirthDate', 'HireDate', 'Address', 'City', 'Region', 'PostalCode', 'Country', 'HomePhone', 'Extension', 'Notes', 'ReportsTo', 'PhotoPath', 'Photo'],
        proxy: {
            type: 'ajax',
            url: 'http://localhost:8090/api/Control',
            reader: {
                type: 'json',
            }
        },
        autoLoad: true,
        listeners: {
            load: function (store, records, options) {
            }
        },

    });

    var filters = { //
        ftype: 'filters',
        encode: false,
        local: true,

        filters: [{
            type: 'boolean',
            dataIndex: 'visible'
        }]
    };

    var gridPanel = Ext.create('Ext.grid.Panel', {
        renderTo: Ext.getBody(),
        store: store,
        itemId: 'gridPanel',
        region: 'north',
        //height: 460,
        split: true,
        collapsible: true,
        features: [filters],
        columns: [
                //flex  有width 寬為其值  剩下的撈會依比例 分剩下的欄寬  Ex. 5個欄位 flex 分別為  1 2 3 4 5   flex 為2 的就是  2/15 剩下的欄寬
                { text: 'EmployeeID', width: 100, dataIndex: 'EmployeeID', sortable: true, filter: true }, //filter 可篩選
                { text: 'LastName', flex: 1, dataIndex: 'LastName', sortable: true },
                { text: 'FirstName', flex: 1, dataIndex: 'FirstName', sortable: true },
                { text: 'Title', flex: 1, dataIndex: 'Title', sortable: true },
                { text: 'TitleOfCourtesy', flex: 1, dataIndex: 'TitleOfCourtesy', sortable: true, filter: true },
                { text: 'BirthDate', flex: 1, dataIndex: 'BirthDate', sortable: true, filter: true },
                { text: 'HireDate', flex: 1, dataIndex: 'HireDate', sortable: true, filter: true, renderer: Ext.util.Format.dateRenderer('Y/m/d A g:i:s '), },// formate 時間格式
                { text: 'Address', flex: 1, dataIndex: 'Address', sortable: true, filter: true },
                { text: 'City', flex: 1, dataIndex: 'City', sortable: true, filter: true },
                { text: 'Region', flex: 0.5, dataIndex: 'Region', sortable: true, filter: true },
                { text: 'PostalCode', flex: 1, dataIndex: 'PostalCode', sortable: true, filter: true },
                { text: 'Country', flex: 1, dataIndex: 'Country', sortable: true, filter: true,  },
                { text: 'HomePhone', flex: 1, dataIndex: 'HomePhone', sortable: true, filter: true },
                { text: 'Extension', flex: 1, dataIndex: 'Extension', sortable: true, filter: true },
                { text: 'mappingField', flex: 1, dataIndex: 'mappingField', sortable: true, filter: true }
        ],
        loadMask: true,
        dockedItems: [Ext.create('Ext.toolbar.Toolbar', {
            dock: 'top',
            items: [
                '->',
                {
                    xtype: 'button',
                    text: 'toolbarButton',
                    handler: function () {
                    }
                },
                {
                    xtype: 'button',
                    text: 'toolbarButton2',
                    handler: function () {
                    }
                }
            ]
        })],
        emptyText: 'No Matching Records',
    });
});

結果圖:


2014年1月27日 星期一

ASP.NET MVC 4 WebApi 與 Extjs 的結合 -- 建立基本控制項

在看到這篇教學,請先參考 Visual Studio 2012 安裝 Northwind 資料庫並建立 Entity Framework Database First ( .edmx ) 以及 ASP.NET MVC 4 WebApi 與 Extjs 的結合 -- 基本配置

本篇是介紹「建立基本控制項」,先在 Scripts/Example/ 建立 base-control.js,在頁面上 ( *.html ) 也只需要套用 base-control.js。

在使用 Extjs 開始,必須要引入要使用到的套件,可以把這個動作想成是在寫一個 C# 類別時,上面會 using 哪幾個 dll 一樣:
Ext.require([
    'Ext.form.*',
    'Ext.layout.container.Absolute',
    'Ext.window.Window',

    'Ext.Button'
]);

並且和 jQuery 的 $( document ).ready() 一樣,在文件載入時就會執行的函式:
Ext.onReady(function () {

    // 內容

});

本篇是要使用 Window 視窗內嵌一個表單 ( form ),所以基本上要先建立 form 內容:
var form = Ext.create('Ext.form.Panel', {
        defaultType: 'textfield', // 預設 tpe (xtype) 沒有指定就是textfield
        border: false, //不要外框
        layout: 'form', // form 的形式顯示 items 自動填滿畫面
        padding: 10, // 為 css padding 10 px
        item: [ 
            // 表單內容
        ]
    });

也要建立 Window 視窗放 form:
// 建立一個window 的框
var win = Ext.create('Ext.window.Window', {
    id: 'windowId',
    autoShow: true, 
    title: '基本控制項',
    layout: 'fit',
    items: form,
    width: 500,
    y:20
});

執行後可以得到這樣的畫面:


在表單內容部分,每個欄位設定是 json 格式,類似帶參數的方式來改變與調整控制項的特性:
[
    {
        id: 'textfieldId', 
        xtype: 'textfield', 
        fieldLabel: '文字欄位', 
        msgTarget: 'side', 
        allowBlank: false,
        name: 'textfield',
    },
    {
        id: 'numberfieldId',
        xtype: 'numberfield',
        name: 'bottles',
        fieldLabel: '數字欄位',
        value: 99,
        maxValue: 99,
        minValue: 0
    },
    {
        id: 'comboboxId',
        xtype: 'combobox', //類似下拉式選單
        editable:false,//可否自己輸入
        queryMode: 'local', // local / remote  remote 按下就會reload store
        fieldLabel: '下拉欄位',
        name: 'combobox', 
    },
    {
        id: 'textareaId',
        fieldLabel: '文字區域欄位',
        xtype: 'textarea',
        name: 'textarea',
    },
    {
        id: 'radiogroupId',
        xtype: 'radiogroup',
        fieldLabel: '單選欄位',
        name:'radioValue',
        columns: 2, //1 row = 2 columns 
        vertical: true, 
        items: [
            // 單選內容
            { boxLabel: '靜態 1', name: 'rb', inputValue: '1' },
            { boxLabel: '靜態 2', name: 'rb', inputValue: '2', checked: true },
            
        ]
    }
],
// 按鈕
buttons: [{
    text: 'Send',
    handler: function () { // button 按下動作
        
    }
}, {
    text: 'Cancel'
}]

設定完成執行後的畫面


如果要在這些欄位加上資料就要先把 API 做好,在 ASP.NET MVC 4 WebApi 與 Extjs 的結合 -- 基本配置 已經有說明了,所以決定使用 employee 的 API, URL: http://localhost/api/Employee/ 。

所以在 Extjs 裡面要先將資料放在 Ext.data.JsonStore 內:
var store = Ext.create('Ext.data.JsonStore', {
    storeId: 'store',
    //model: 'Model',
    //欄位  也可以使用model 
    fields: ['EmployeeID', 'LastName', 'FirstName', 'Title', 'TitleOfCourtesy', 'BirthDate', 'HireDate', 'Address', 'City', 'Region', 'PostalCode', 'Country', 'HomePhone', 'Extension', 'Notes', 'ReportsTo', 'PhotoPath','Photo'],
    proxy: {
        type: 'ajax',
        url: 'http://localhost/api/Control',
        reader: {
            type: 'json',
        }
    },
    autoLoad: true, //自動載入
    listeners: {
        load: function (store, records, options) { // sotre load 完成後載入這個fucntion  
        }
    }
})

最後讀取到的資料放入到各欄位中,完成的程式碼為:
//載入會用到的程式
Ext.require([
    'Ext.form.*',
    'Ext.layout.container.Absolute',
    'Ext.window.Window',

    'Ext.Button'
]);

Ext.onReady(function () {
    var store = Ext.create('Ext.data.JsonStore', {
        storeId: 'store',
        //model: 'Model',
        //欄位  也可以使用model 
        fields: ['EmployeeID', 'LastName', 'FirstName', 'Title', 'TitleOfCourtesy', 'BirthDate', 'HireDate', 'Address', 'City', 'Region', 'PostalCode', 'Country', 'HomePhone', 'Extension', 'Notes', 'ReportsTo', 'PhotoPath','Photo'],
        proxy: {
            type: 'ajax',
            url: 'http://localhost:8090/api/Control',
            reader: {
                type: 'json',
            }
        },
        autoLoad: true, //自動載入
        listeners: {
            load: function (store, records, options) {// sotre load 完成後載入這個fucntion  
                Ext.getCmp('textfieldId').setValue(records[0].get('Title'));//取得Id 為textfieldId 的元件 使用setValue的方法給值 record.get() 取得Title
                Ext.getCmp('textareaId').setValue(records[0].get('Notes'));
                Ext.getCmp('comboboxId').setValue(records[0].get('EmployeeID'));
                var tempRadioGroup = Ext.getCmp('radiogroupId');
                for (var i = 0; i < records.length; i++) {
                    //RadionGroup 加入 radio button
                    tempRadioGroup.add({
                        boxLabel: records[i].get('FirstName'), name: 'radioGroup', inputValue: records[i].get('EmployeeID')
                    })
                }
            }
        },
    })
    //建立 form 框架
    var form = Ext.create('Ext.form.Panel', {
        defaultType: 'textfield', //預設 tpe (xtype) 沒有指定就是textfield
        border: false, //不要外框
        layout: 'form', //form 的形式顯示 items 自動填滿畫面
        padding: 10, //css padding 10 px
        items:
        [
            {
                id: 'textfieldId', 
                xtype: 'textfield', //item type
                fieldLabel: 'textfieldLabel', 
                msgTarget: 'side', 
                allowBlank: false,
                name: 'textfield',
            },
            {
                id: 'numberfieldId',
                xtype: 'numberfield',//數字欄位
                //anchor: '100%',
                name: 'bottles',
                fieldLabel: 'Bottles of Beer',
                value: 99,
                maxValue: 99,
                minValue: 0
            },
            {
                id: 'comboboxId',
                xtype: 'combobox', //類似下拉式選單
                editable:false,//可否自己輸入
                queryMode: 'local', // local / remote  remote 按下就會reload store
                store: store, //資料來源
                displayField: 'Title', //顯示欄位
                valueField: 'EmployeeID', //value 欄位
                fieldLabel: 'comboboxfieldLabel',
                name: 'combobox', 
            },
            {
                id: 'textareaId',
                fieldLabel: 'textareaLabel',
                xtype: 'textarea',
                name: 'textarea',
            },
            {
                id: 'radiogroupId',
                xtype: 'radiogroup',
                fieldLabel: 'Two Columns',
                // Arrange radio buttons into two columns, distributed vertically
                name:'radioValue',
                columns: 2, //1 row = 2 columns 
                vertical: true, 
                items: [
                    { boxLabel: '靜態 1', name: 'rb', inputValue: '1' },
                    { boxLabel: '靜態 2', name: 'rb', inputValue: '2', checked: true },
                    
                ]
            }
        ],
        buttons: [{
            text: 'Send',
            handler: function () {//button 按下動作
                this.up('form').getForm().isValid();//檢查form isValid  檢查條件是否符合
                
            }
        }, {
            text: 'Cancel'
        }]
    });

    //建立一個window 的框
    var win = Ext.create('Ext.window.Window', {
        id: 'windowId',
        autoShow: true, 
        title: '基本控制項',
        layout: 'fit',
        items: form,
        width: 500,
        y:20
    });

});

最後顯示的頁面就會變成:


2014年1月26日 星期日

ASP.NET MVC 4 WebApi 與 Extjs 的結合 -- 基本配置

在使用 Extjs 建置 View 端時,必須先引入 Extjs 的引擎檔案,位置在根目錄下的 ext-all.js ,另外必需引用主題 css,此會依照你挑選的主題 css 外觀上而有所不同,這部分的檔案在 /resources/ 下的目錄之中,套用個目錄內的 ext-theme-*-all.css 就可以開始使用 Extjs 了。


<!-- ExtJS -->
<script type="text/javascript" src="/Scripts/ext/ext-all.js"></script>

<!-- CSS -->
<link rel="stylesheet" type="text/css" href="/Scripts/ext/resources/ext-theme-neptune/ext-theme-neptune-all.css" />

1.

建置 View 端一開始要先寫一個 Controller 來啟動頁面,實際上是沒有內容的,例如:

在 View 建置 Ext/BaseControl.html 後在 Controller 建置一個 ExtController 內放一個 BaseControl() 只回傳 View(),基本上只需要讓他可以讀取就好了:


ExtController 內容為:

public class ExtController : Controller
{
    public ActionResult Index()
    {
        return View();
    }

    public ActionResult BaseControl()
    {
        return View();
    }
}

為什麼這麼麻煩? 這是為了讓它保持在路由內,有主版頁面,還是可以使用 Razor,只是說在跨平台的環境中並沒有 Razor 可以使用,為了要快速套用到別的環境中,所以越是純 html 會比較好。

2.

在 Script 底下新增一個資料夾,暫名為 Example,之後所有範例的 JS 檔都開在此。

3.

建立一個 API 方便之後範例使用,建立資料模型可以參考 Visual Studio 2012 安裝 Northwind 資料庫並建立 Entity Framework Database First ( .edmx ),使用 employee 表輸出所有資料表:

public class EmployeeController : BaseApiController
{
    public IEnumerable<Employees> GetEmployees()
    {
        var employees = db.Employees;

        foreach (Employees employee in employees)
        {
            employee.Employees1 = null;
            employee.Employees2 = null;
        }

        return employees;
    }

    public string Get(int id)
    {
        return "value";
    }

}

而 API 的 URL 為:http://localhost/api/Employee/ 。

順便一提,方便管理所有 Controller 常用的函式和共用變數,必須建立一個 BaseApi:
public class BaseApiController : ApiController
{
    protected NORTHWNDEntities db = new NORTHWNDEntities();

    public BaseApiController()
    {
        db.Configuration.ProxyCreationEnabled = false;
    }

}


大致上基本配置就是這樣,如果還有缺之後會補上,之後的教學都會先照篇文章做初始配置。

2014年1月24日 星期五

ASP.NET MVC 4 WebApi 使用 Northwind 建置 Controller 所遇到的問題

如何在 Visual Studio 2012 建置 Northwind ,已經有在 Visual Studio 2012 安裝 Northwind 資料庫並建立 Entity Framework Database First ( .edmx ) 說明過了,若還未建置的可以參考。

建置完成後,開始建立 Controller,使用 Employees 員工資料表,將所有資料讀取出來:

public IEnumerable<Employees> GetEmployees()
{
    var employees = db.Employees;
    return employees;
}

執行後會發生錯誤:


不需要資料合約名稱為 'Employees_14BF9F9F0C1DAB0594B23F2EB7695ECA92DD0B880DFF02A4CD9698A2DADBA635:http://schemas.datacontract.org/2004/07/System.Data.Entity.DynamicProxies' 的型別 'System.Data.Entity.DynamicProxies.Employees_14BF9F9F0C1DAB0594B23F2EB7695ECA92DD0B880DFF02A4CD9698A2DADBA635'。請考慮使用 DataContractResolver,或將任何不明的型別新增到已知型別清單 - 例如,可以使用 KnownTypeAttribute 屬性,或將它們新增到會傳送給 DataContractSerializer 的已知型別清單。

這是由於未禁用 Entity Framework 建立 Proxy 執行個體,所以可以使用以下兩種方法解決:

1.

在 Models 目錄下 Northwind 檔案中的 Northwind.Context.tt 之 Northwind.Context.cs 中,加上 this.Configuration.ProxyCreationEnabled = false;


public NORTHWNDEntities()
    : base("name=NORTHWNDEntities")
{
    this.Configuration.ProxyCreationEnabled = false;
}

2.


或者建立一個 BaseApiController 來使所有 Api 都繼承於它,而只要是共用方法、變數、函式都可以寫在裡面:

public class BaseApiController : ApiController
{
    protected NORTHWNDEntities db = new NORTHWNDEntities();

    public BaseApiController()
    {
        db.Configuration.ProxyCreationEnabled = false;
    }

}

其實兩種方法都可以解決這問題,只是程式碼擺的位置不一樣。

重新執行專案,同一個 Api,執行後會還是會發生錯誤:

類型 'System.Collections.Generic.HashSet`1[[MVVMwithExtjs.Models.Employees, MVVMwithExtjs, Version=1.0.0.0, Culture=neutral, PublicKeyToken=null]]' 的物件圖形包含循環,且如果已停用參照追蹤,便無法被序列化。

遇到循環參考,其實 KKBruceASP.NET WEB API - ENTITY FRAMEWORK(EDMX) NAVIGATION PROPERTY引發的JSON物件循環參考錯誤保哥ASP.NET Web API 無法輸出 Entity Framework 物件的解法 已經有說明過了,最佳解為「用 Partial Class 與 MetadataType 的方式擴充這些由 Visual Studio 幫我們產生的類別」。

如果隱藏輸出循環參考的資料,將會變成以下格式:
[
    {
        "$id": "1", 
        "Category": {
            "$id": "2", 
            "Products": [
                {
                    "$id": "3", 
                    "Category": {
                        "$ref": "2"
                    }, 
                    "Id": 2, 
                    "Name": "Yogurt"
                }, 
                {
                    "$ref": "1"
                }
            ], 
            "Id": 1, 
            "Name": "Diary"
        }, 
        "Id": 1, 
        "Name": "Whole Milk"
    }, 
    {
        "$ref": "3"
    }
]
物件多了 $id,甚至是整個物件內就只有一個 $ref ,資料變得較難閱讀。

因為使用 WebApi 就必須確認資料的完整性,如果都是在微軟的環境下當然沒有問題,但是資料如果提供給手機程式使用,或者是跨平台的環境中,這種資料格式就不見得在不同的環境中可以閱讀。

我的解法,是將這些循環參考的資料在送出之前,將循環參考的資料設為 null。
public IEnumerable GetEmployees()
{
    var employees = db.Employees;

    foreach (Employees employee in employees)
    {
        employee.Employees1 = null;
        employee.Employees2 = null;
    }

    return employees;
}

最後就會得到以下結果:


如果還需要更詳細的資料就另外再寫一個 API 就好了,在一個 API 若是給予太多資訊且又是公開資訊讀取,反而可能會造成 Server 的負擔,最重要的是:「資料的完整性」。


2014年1月23日 星期四

Visual Studio 2012 安裝 Northwind 資料庫並建立 Entity Framework Database First ( .edmx )

Visual Studio 2012 安裝 Northwind 其實有些麻煩,如果是在微軟官方網站上下載的 Northwind,已經不能直接使用在 Visual Studio 2012 上,會發生以下錯誤:


而在 SQL Server 社群找到一篇問題 SQL 2012 will not convert a SQL 2000 database?,網友建議說:

「 you can only attach databases from two version below, ie from 2005->2008/R2->2012, not 2000 to 2012. You cannot attach a 2000 database to 2012. Although i haven't seen documentation on this, can you attach it to 2008/R2 then attach it to 2012 instance? 」

就是要經過三次資料庫升級後,最後 Northwind 才能掛在 Visual Studio 2012 上,而 Migration SQL Server 2000 to SQL Server 2012 說得更清楚了:

「 You will have to make the migration in two steps:

- Step 1: Make a first migration from SQL 2000 to SQL 2008 for instance. You need to be SQL 2000 SP4, then follow this step : Migration SQL Server 2000 to SQL Server 2008

- Step 2: Make a second migration from SQL Server 2008 to 2012. 」

可直接從 SQL 2000 to SQL 2008 再從 SQL Server 2008 to 2012,不過,有誰會灌那麼多 SQL 版本在自己電腦上啊? 又不是吃飽沒事幹 ! ,後來我放棄了,直接去網路上找現成已經轉好的,好險後來有找到,連結在

Install Northwind database in Microsoft SQL Server 2012 in 3 easy steps

Download Northwind

以上連結是已經升級好的 Northwind 資料庫。挖銬,前面說那麼多,不都白說了。其實,如果此連結失效,還有備用解決方法。

接著,照以下步驟做就可以把 Northwind 掛進去:

1.

先至 Install Northwind database in Microsoft SQL Server 2012 in 3 easy steps 下載檔案。

2.

將 Northwind 掛到 Visual Studio 2012 的 App_Data 底下。

3.

接著再 Models 點右鍵,加入新項目,選擇「 ADO.NET 實體資料模型」

選擇「從資料庫產生」


選擇「NORTHWND.MDF」,如果找不到可以自己新增連接,或者將專案建置一次


接著勾選專案要使用的資料表、檢視、預存程序和函式,在這邊我是全勾


完成就可以看到整個資料庫的關聯圖


最後就可以開始在 ASP.NET MVC 4 的專案中使用了。


2014年1月20日 星期一

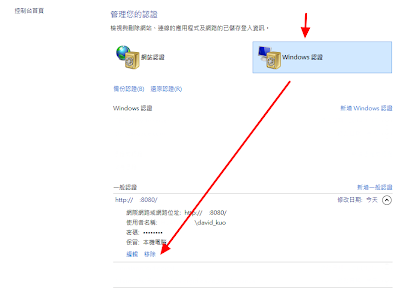
如何切換 Visual Studio 2012 TFS ( Team Foundation Server ) 使用者

使用 Visual Studio 2012 操作時,本來都是使用管理者 ( Administrator ) 的權限將專案簽入簽出,但是由於管理者的帳號密碼修改過,以致於無法登入,後來使用個人 ( Personal ) 權限想將專案簽入,但是發現工作區已經被佔住,所以又想切回管理者來使用,發現無法登出。


後來發現是要在「認證管理員」將認證註銷,才能切換 TFS 使用者。因此,Visual Studio 2012 TFS 在儲存認證時,是在 windows 認證內。

請依照以下步驟切換:

1.

至「控制台」內選擇「使用者帳戶」


後選擇「管理 Windows 認證」


找尋 TFS 位置並將之刪除


2.

最後重新執行專案,在重新連線至 TFS 後,會跳出一個視窗要求你重新輸入帳號密碼。這樣一來就解決了。


2014年1月17日 星期五

ASP.NET MVC 4 WebApi 多專案執行之間的資料傳遞

ASP.NET MVC 4 WebApi 中,一個方案底下可以掛上多個專案,在專案之間使用 Api 做資料傳遞,如果是以「 Windows Azure 雲端服務」專案,當然,部署到雲端當然沒有問題,因為各 Api 在溝通時,都已經知道要呼叫 Api 的網址了。

但是,在本機執行測試並不是這麼一回事,因為它執行後 IP:Port 會亂跳,而且是視載入狀況而決定它是哪一個 IP:Port,且如果使用 Windows Azure 雲端服務執行,還必須先啟動 Windows Azure 偵錯環境,多個專案就會啟動幾次,還會失敗,執行一次就非常耗時。

例如,有三個專案如下圖


執行後三個專案的 IP:Port 分別為:http://127.0.0.1:81/、http://127.0.0.3:82、http://127.0.0.2:81,且有兩個專案是失效的,而且下次執行後,IP:Port 還會不一樣,OMG,所以根本無法測試,如果你也遇到這種情況,使用下面方法解決:

1.

在方案內設定將所有執行 Azure 專案轉為非 Azure 專案,這個動作是要將所有網頁執行出來的網址都是 localhost。


2.

接著將每個專案都指定一個獨特的 port 號,這樣就能完全指定每一個專案執行出來的網址是唯一且不會變動的。


最後在各專案之間就可以先將其他的 Api Domain 寫在 web.config 方便取用,最後部署到雲端之前先將 Domain 改掉就可以了。


2014年1月15日 星期三

Azure Storage Explorer 輕鬆管理 Windows Azure 儲存體

Azure Storage Explorer 是一個可以輕鬆管理 Windows Azure 儲存體的工具,省去在一般管理時切換不同的 Blob、Table、Queue 甚至是不同的儲存體操作的時間,如果是私密的 Blob,可以很快的取得 Blob 在 SAS ( shared access signature ) 後的網址。初次使用,只需要做一次設定,往後即可方便且快速使用。

以下就說明 Azure Storage Explorer 安裝設定與基本操作。

1.

首先到 Azure Storage Explorer 官方網站 下載 Azure Storage Explorer 到本機硬碟。


2.

利用「傻瓜安裝法」將 Azure Storage Explorer 安裝到電腦。

3.

執行 Azure Storage Explorer 後會如同下圖狀態


4.

接下來就要做初始設定了,在 Azure Storage Explorer 點擊 Add Account 會跳出要輸入 Storage account name 和 Storage account key,此時要至 Windows Azure 選擇儲存體且取得儲存體的名稱與金鑰。如下圖所示設定:


5.

設定完成後,即可針對該儲存體的內容做新增或是調整,右側上方可以選擇該儲存體的 Blob、Table 或 Queue,而左上方可以新增、複製、更名、刪除 實體,而右邊中間區塊就是實體內的物件列表,若是 Blob 裡面就是檔案列表。雙擊某個檔案就會顯示該檔案資訊。


6.

由於 Table、Queue 操作較單純,功能很雷同,這裡就讓各位使用者去嘗試,在此針對 Blob 說明較獨特的功能做說明。

除了基本功能:檢視、複製、更名、刪除、上傳、下載,另外還有一個權限功能:

Blob 針對容器有三種權限設定,Private、Public Blob、Public Container,其中 Public Container 是只要知道這個檔案網址的人都可以對此檔案做動作,其他都必須要取得含有所謂的共享存取簽章( Shared Access Signature ) 的網址,以便讓系統知道這個網址是有權限讀取的。網址後面會帶取得這圖片的 token,而這 token 經過解密後,就可以得知使用者對這張照片所有的權限。

所以依照下圖所示,即可取得檔案含有共享存取簽章( Shared Access Signature ) 的網址。當然,你可以在這上面設定這張圖片的新增、寫入、刪除、列表功能,甚至是存取的時間。


Azure Storage Explorer 是一個很好用的工具,幾個鍵就等於在網頁上做很多動作,這可能要使用過後才會有這樣的感覺。


2014年1月14日 星期二

ASP.NET MVC 4 WebApi Help Page 建立自訂的說明文件

在建立 ASP.NET MVC 4 WebApi 專案,過程中它會建立一個 Help Page,協助開發人員對自己撰寫的 Controller 下註解,以便初次進入專案的開發人員快速了解每一個 Api 並且使用,且方便交接。


看這次的例子,此 Controller 有兩個 Api,如下圖所示:


看來此處的 Api 說明,並不是開發人員自己定義的,所以接下來的設定,可以使這些說明變成是開發人員定義的。

參考:Creating Help Pages for ASP.NET Web API

1.

在專案的 Areas 下有 Help Page 資料夾,這裡就是產生 Help Page 內容的 MVC,如有興趣可參考。 接著就把 App_Start 底下檔案 HelpPageConfig.cs 做修改:


config.SetDocumentationProvider(new XmlDocumentationProvider(
    HttpContext.Current.Server.MapPath("~/App_Data/XmlDocument.xml")));

把此行註解拿掉以啟用,此行意思是建立一個 XML 檔案來存放開發人員定義的說明文件,存放位置為 ~/App_Data/XmlDocument.xml。

2.

此時對專案點擊右鍵 > 屬性 > 建置,對 XML 文件檔案方框打勾,設定存放位置為 App_Data/XmlDocument.xml。


3.

再去修改剛剛的 Controller Api,使用三個斜線的註解去說明此 Api 的功能為何,如以下所示:

/// <summary>
/// [後台] 取得 單一部門 資料
/// </summary>
/// <param name="id">編號</param>
/// <param name="language">語系</param>
/// <param name="date">日期</param>
/// <returns></returns>
public async Task<OM_Department> Get(Guid id, string language, DateTime date)
{
 // ...
}

設定到此,已經算是完成了。最後執行專案看看結果:


而 App_Data/XmlDocument.xml 產生的內容為:
<?xml version="1.0"?>
<doc>
    <assembly>
        <name>Backend</name>
    </assembly>
    <members>
 
  ...
  
        <member name="M:Backend.Areas.orgmaintainer.Controllers.OM_DepartmentController.Get(System.Guid,System.String,System.DateTime)">
            <summary>
            [後台] 取得 單一部門 資料
            </summary>
            <param name="id">編號</param>
            <param name="language">語系</param>
            <param name="date">日期</param>
            <returns></returns>
        </member>
        
  ...
  
    </members>
</doc>

最後補充一點,必須每個 Api 上都要加上註解以說明,不然它是不會幫你自動產生,而會出現 「No documentation available.」。