2014年3月30日 星期日

ASP.NET MVC 4 WebApi 與 Extjs 的結合 -- Message Box ( 訊息框 )

通常使用一般網頁,填妥一張表格要送出,可能會將頁面導回主檔頁面,或者是在頁面上顯示文字說明送出完成,也可以像這篇主題一樣,彈出訊息讓使用者知道動作已經完成,可以按下確定,繼續下一個動作。

訊息框

首先就來建立一個基本的訊息框:
Ext.MessageBox.alert('提示', '儲存成功');

或者,在按下訊息框後再處理另外的指令,可以這樣處理:
Ext.MessageBox.alert('提示', '儲存成功', callback);

function callback() {
    alert('視窗關閉');
}

執行後畫面如下:

確認框

Ext.MessageBox.confirm("確認","確定儲存");

執行後畫面如下:

這裡可以結合小弟先前的 ASP.NET MVC 4 WebApi 與 Extjs 的結合 -- 動態複製表單並送出 的文章,再送出時加上確認框,如果確認則送出,取消則不送出。按鈕結果狀態有二, yes 或 no。

在送出表單時可以修改成:
Ext.MessageBox.confirm("確認", "確定儲存", function (btn) {
    if (btn == 'yes') {
        Ext.getCmp('form').getForm().submit({
            // 傳送到 url
            url: 'http://localhost:8090/api/Product/Post',
            method: 'POST'
        });
    }
});

而 API 就會接收到 Form 來的訊息

修改按鈕顯示文字

上面的例子在彈出視窗後,按鈕文字都是英文的,如何修改按鈕顯示文字,透過以下指令:
Ext.MessageBox.buttonText = {
    ok: "確定",
    cancel: "取消",
    yes: "是",
    no: "否"
};

而確認框中,就會顯示:

輸入框

輸入空可以用在密碼再次確認的情況,將密碼送回到 API 檢查,視使用者是否有權限進入下一頁。
Ext.MessageBox.prompt("輸入", "您的密碼:", function (btn, text) {
   
});

按鈕結果狀態有二,ok 與 cancel, btn 為選擇狀態;text 為輸入文字。

自訂義訊息框

參數設定如以下程式碼,稍微看一下註解應該就差不多了:
Ext.MessageBox.show({
    title: '標題',
    msg: "自訂義訊息框",
    // 寬度
    width: 300,
    // 多行輸入
    multiline: true,
    // 關閉按鈕
    closable: false,
    // 顯示圖示
    icon: Ext.MessageBox.INFO,
    // 按鈕型態
    buttons: Ext.MessageBox.YESNOCANCEL,

    fn:  function(btn, text) {
   
    }
});

icon 可以設定成: INFO ( 訊息圖示 )、WARNING ( 警告圖示 )、QUESTION ( 詢問圖示 )、 ERROR ( 錯誤圖示 )
buttons 可以設定成: OK ( 確定 )、 CANCEL ( 取消 )、OKCANCEL( 確定和取消 )、YESNO ( 是和否 )、YESNOCANCEL ( 是和否和取消 )

進度框

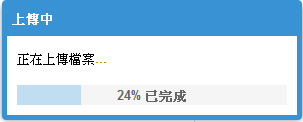
進度框也是自訂義訊息框的一種,它只需要把屬性 progress 改為 true 就可以了。

進度框可以使用 Ext.MessageBox.updateProgress 設定進度與文字,以下參考 ExtJs学习之弹出框,提示框,输入框等框

Ext.MessageBox.show({
    title: '上傳中',
    msg: "正在上傳檔案...",
    progressText: '正在初始化...',
    // 寬度
    width: 300,
    // 關閉按鈕
    closable: false,
    // 顯示進度
    progress: true,
    fn:  function(btn,text) {   
    }

});

var f = function (v) {
    return function () {
        if (v == 22) {
            Ext.MessageBox.hide();
            Ext.MessageBox.alert('完成', '所有項目上傳完成');
        } else {
            var i = v / 21;
            Ext.MessageBox.updateProgress(i, Math.round(100 * i) + '% 已完成');
        }
    };
};

for (var i = 0; i < 23; i++) {
    setTimeout(f(i), i * 500);
}

執行後如下圖:

參考與引用:ExtJs学习之弹出框,提示框,输入框等框ExtJS 入门学习之 messagebox篇

2014年3月26日 星期三

中文數字轉阿拉伯數字 ( C# 測試版 )

如何將「六十兆零五十二億三千八百六十二萬六千四百二十五」轉為阿拉伯數字,網路上大部分都是將阿拉伯數字轉為中文數字,所以我就自己來寫一個中文數字轉阿拉伯數字。

首先要定義一、二、三、....、九的對應,且要定義百、千、億、兆的對應,由於「兆」已經超過 int ( 整數 ) 範圍了,所以在這裡使用 log ( 長整數 ):
Dictionary<string, long> digit =
    new Dictionary<string, long>() 
    { { "一", 1 }, 
      { "二", 2 }, 
      { "三", 3 }, 
      { "四", 4 }, 
      { "五", 5 }, 
      { "六", 6 }, 
      { "七", 7 }, 
      { "八", 8 }, 
      { "九", 9 } };
Dictionary<string, long> word =
    new Dictionary<string, long>() 
    { { "百", 100 }, 
      { "千", 1000 }, 
      { "萬", 10000 }, 
      { "億", 100000000 }, 
      { "兆", 1000000000000 } };

Dictionary<string, long> ten =
    new Dictionary<string, long>() 
    { { "十", 10 } }; 

為何要這樣宣告?假設說你的一為壹、二為貳、.....、九為玖,就可以多加幾列
{ "壹", 1 }, 
{ "貳", 2 }, 

...

{ "玖", 9 },

百、千、億、兆 位數字也可以這樣子做,因為中文數字可以混用,甚至可以使用簡體中文,達到最大使用性。

接下來就是程式部份了,其實規格很簡單,數字由左向右,或加或乘且紀錄,當文字碰到比千還大的文字 ( 萬、億、兆 ),就要將紀錄值

我使用兩個變數儲存 t_l、 _t_l,_t_l 紀錄該次讀取的文字,先將文字除掉所有零字。

若為數字,則紀錄於 _t_l;若為十,則看 _t_l 是否為 0,不為 0,則 _t_l 乘上 10,為 0,則 _t_l 為 10;
若不為數字,則將 _t_l 乘上 文字對應的值;
若碰上比千位數大的文字 ( 萬、億、兆 ),就要將 _t_l 加上 t_l 再乘文字對應的值。

最後再把殘餘值加上,輸出結果。

先看程式碼:
public long GetChineseNumberToInt(string s)
{
    long iResult = 0;

    s = s.Replace("零", "");
    int index = 0;
    long t_l = 0, _t_l = 0;
    string t_s;

    while (s.Length > index)
    {
        t_s = s.Substring(index++, 1);

        // 數字
        if (digit.ContainsKey(t_s))
        {
            _t_l += digit[t_s];
        }
        // 十
        else if (ten.ContainsKey(t_s))
        {
            _t_l = _t_l == 0 ? 10 : _t_l * 10;
        }
        // 百、千、億、兆 
        else if (word.ContainsKey(t_s))
        {
            // 碰到千位則使 _t_l 與 t_l 相加乘上目前讀到的數字,
            // 並將輸出結果累加。
            if (word[t_s] > word["千"])
            {
                iResult += (t_l + _t_l) * word[t_s];
                t_l = 0;
                _t_l = 0;

                continue;
            }
            _t_l = _t_l * word[t_s];
            t_l += _t_l;

            _t_l = 0;
        }


    }
    // 將殘餘值累加至輸出結果
    iResult += t_l;
    iResult += _t_l;

    return iResult;

}

迴圈每走完一次,數值的變化:
文字iResultt_l_t_l
006
0060
6000000000000000
6000000000000005
60000000000000050
60000000000000052
6000520000000000
6000520000000003
6000520000000030000
6000520000000030008
6000520000000038000
6000520000000038006
60005200000000380060
60005200000000380062
6000523862000000
6000523862000006
6000523862000060000
6000523862000060004
6000523862000064000
6000523862000064002
60005238620000640020
60005238620000640025

這樣看數值變化比較有感覺。

最後把殘餘值加上,輸出 60005238626425。


2014年3月24日 星期一

ASP.NET MVC 4 WebApi -- 利用繼承實作多專案間的部分類別(partial)

多人開發的專案裡,部分類別(partial)是非常好用的東西,但有個小小的缺點,只能再同一個exe或dll才有作用,如果是參考其他專案的dll,編譯就會失敗
為了減少相同程式碼出現的頻率,所以改用繼承的方式

A專案
namespace A.Models
{
    public class Field
    {
        public Guid FieldId { get; set; }
        public DateTime CreateOn { get; set; }
        public Guid Creater { get; set; }
        public DateTime UpdateOn { get; set; }
        public Guid Updater { get; set; }
  
        public ICollection Language { get; set; }
    }

    public class FieldLanguage
    {
        public Guid FieldLanguageId { get; set; }
        public string Aliases { get; set; }
        public string Notes { get; set; }
        public string Language { get; set; }
  
        public Field Field { get; set; }
    }
}

B專案(參考A專案)
namespace B.Models
{
    public class Field : A.Models.Field
    {
  //放置View所需語系資料
        public string Language_Aliases { get; set; }
        public string Language_Notes { get; set; }
    }
}

當需要把FieldLanguage放到變數中做處理時,就會發生"找不到類型或命名空間名稱'FieldLanguage'"的錯誤

B的Model追加FieldLanguage,因為欄位相同,所以一樣繼承A的FieldLanguage
public class FieldLanguage : A.Models.FieldLanguage { }

雖然解決了找不到類別的問題,但是也多了"類型'A.Models.FieldLanguage'不能隱含轉換為'B.Models.FieldLanguage'"的錯誤
原來繼承裡面所關聯的類別是原本所指定的,不會因為繼承的專案有相同類型名稱而轉換過去,所以繼承後要再把關聯加回去
public ICollection FieldLanguage { get; set; }

這邊會有一個警告,"'B.Models.FieldLanguage'隱藏了繼承的成員'A.Models.FieldLanguage'。如果是刻意要隱藏,請使用new關鍵字"
因為名稱是一樣的,所以編譯器會自動把父類別的屬性或方法隱藏掉
PS:範例是用屬性,所以用new的方式,如果是方法,請盡量使用override(可參考new和override的差異與目的)
public new ICollection FieldLanguage { get; set; }

FieldLanguage當然也要參考回Field
public new Field Field { get; set; }

最後B的類別如下:
namespace B.Models
{
    public class Field : A.Models.Field
    {
        public string Language_Aliases { get; set; }

        public string Language_Notes { get; set; }

        public new ICollection FieldLanguage { get; set; }
    }

    public class FieldLanguage : A.Models.FieldLanguage
    {
        public new Field Field { get; set; }
    }
}
以上就可以完成多專案的部分類別,各專案本身當然也是可以繼續使用部分類別(partial)

問:為什麼要加回關聯?
答:因為在Model只要做一次,後面資料處理就可以很輕鬆,當然不加也是可以,只是資料處理還要做型態轉換,如果這個Model很多地方會使用,那光型態轉換就有得忙了

參考:
new和override的差異與目的
區分 abstract、virtual、override 和 new

2014年3月22日 星期六

ASP.NET MVC 4 WebApi 與 Extjs 的結合 -- Tabs ( 頁籤 )

頁籤 ( Tabs ) 在許多網頁中都可以看到它的使用,通常使用時機就是這個頁面資訊太多,但又必須讓使用者不需要做太多的動作而得知資訊,如果一次將資訊顯示出來,那使用者必須滾動滑鼠滾輪才能看到資訊,通常最主要的資訊是不會讓使用者做這個動作才能看到,所以頁籤的使用時機就是在此,例如: yahoo 首頁的新聞,我最常使用的就是這一塊,我只需要幾個點擊就可以觀看到主要的新聞,算是一個很方便且實用的控制項。

基本

先來 View 端如何建置 Tabs,以下為最基本的程式碼,item 內為頁籤與其內容或方法:
var tp = new Ext.TabPanel({
    renderTo: Ext.getBody(),
    width: 600,
    height: 200,
    items: [
        
    ]
});

預設頁面載入時停留在某一個 tab,與陣列索引值相同,第一個為 0:
activeTab: 0

頁籤顯示位置,可以設置 left、top、right、bottom
tabPosition: 'left'

一般頁籤

先加入一個頁籤:
{
    title: '一般頁籤',
    html: 'Lorem ipsum dolor sit amet, consectetuer adipiscing elit. Sed metus nibh, sodales a, porta at, vulputate eget, dui. Pellentesque ut nisl. Maecenas tortor turpis, interdum non, sodales non, iaculis ac, lacus. ' +
          'Vestibulum auctor, tortor quis iaculis malesuada, libero lectus bibendum purus, sit amet tincidunt quam turpis vel lacus. In pellentesque nisl non sem. Suspendisse nunc sem, pretium eget, cursus a, fringilla vel, urna.'
},

一般內容設置

上面的頁籤內容相當的不好看,且內容好像無法顯示完全,我們要調整一下內容的顯示:
bodyPadding: 15 // 內縮 15 單位
autoScroll: true // 內容超過高度,則顯示滾輪軸

autoHeight: true // 自動調整高度,前提是不能設置 Ext.TabPanel 的高度

closable: true // 顯示關閉按鈕

Ajax 頁籤

使用 API 讀取頁籤內容,首先先準備 API 回傳內容:
public ContentResult AjaxContent()
{
    return Content("從 api 來的資料。");
}

而在 View 端則需要這樣寫:
{
    title: 'ajax 頁籤',
    loader: {
        url: 'http://localhost:8090/Ext/AjaxContent'
    },
    listeners: {
        activate: function (tab) {
            tab.loader.load();
        }
    }
},

activate 事件代表點擊到此頁籤時執行。

上述使用 listeners 的這個方法也可以在 loader 內使用 autoLoad: true 有相同效果,差別就在於一個是點擊後才會載入,一個是在頁面載入時就會一同載入。

執行後畫面如下:

設置在資料未從 API 載入前先顯示 Loading 圖示:
loadMask: true
contentType: 'html' // 格式

事件頁籤

其實上面已經提過了,這裡就只顯示程式碼:
{
    title: '事件頁籤',
    listeners: {
        activate: function (tab) {
            setTimeout(function () {
                alert(tab.title + ' 已使用.');
            }, 1);
        },
        deactivate: function (tab) {
            setTimeout(function () {
                alert(tab.title + ' 已離開e.');
            }, 1);
        }
    },
    html: "不管此頁籤使用或離開,都會觸發事件"
},

失效頁籤

使頁籤不能點擊與使用
{
    title: '失效頁籤',
    disabled: true,
    html: "Can't see me cause I'm disabled"
}


2014年3月19日 星期三

Extjs 使用 loadData 會對應不到 mapping 的值之解決方法

我先前有針對 Combo 連動作一篇解說:ASP.NET MVC 4 WebApi 與 Extjs 的結合 -- Combo 連動

我在做四層 Combo 資料連動時發現了這個問題,一般連動選單項目時,如果顯示的內容和值在同一層 json 裡面不會有問題,這個問題發生在如果顯示的內容與值是在內嵌欄位時,資料會對應錯誤而導致顯示不出來

先看原本從 API 傳過來的資料 ( 已經過刪減,註解部分為後來加上 ):
"JobLevel": [
    "Id": "1",
    "Code": "T1", 
    {
        "JobGroupMapping": [ 
            {
                "Id": "1",
    
                ...
                // 顯示資料
                "JobGroup": {
                    "Id": "1",
                    "Language_Name": "工程師" 
                },
                // 連動資料
                "JobTitle": [
                        {
                            "Id": "1",
                  
                            // ...
                  
                            "Language_Name": "工程師"
                        },
                        {
                            "Id": "2",
      
                            // ...
      
                            "Language_Name": "資深工程師"
                        },
                        {
                            "Id": "3",
      
                             // ...
      
                            "Language_Name": "主任工程師"
                        }
                ]
            }
        ]
    }
]

而我這兩張表的 Extjs Model 為:
Ext.define('JobLevel', {
    extend: 'Ext.data.Model',
    fields: [
        { name: 'Id', type: 'string' },
        { name: 'Language_Name', type: 'string' }
    ],
    hasMany: { model: 'JobGroupMapping', name: 'JobGroupMapping' }
});

Ext.define('JobGroupMapping', {
    extend: 'Ext.data.Model',
    fields: [
        { name: 'Id', type: 'string' },
        { name: 'JobGroupId', type: 'string', mapping: 'JobGroup.Id' },
        { name: 'Language_Name', type: 'string', mapping: 'JobGroup.Language_Name' }
    ],
    belongsTo: 'JobLevel'
});

mapping 的意思就是將內嵌 json 的值拉到同一層對應成另外名稱,有別名的意味。選項選取時,就必須設定連動選項的資料內容,這裡我是使用 loadData 將下一層資料帶入 :
{
    itemId: 'field_joblevel',
    name: 'JobLevel.Id',
    editable: false,
    store: storeJobLevel,
    xtype: 'combobox',
    fieldLabel: 'JobLevel',
    queryMode: 'local',
    valueField: 'Id',
    displayField: 'Code',
    listeners: {
        change: function (combo, aNew, aOld) {
            var record = this.findRecord(this.valueField, aNew);
            JobGroupMapping.loadRawData(record.raw.JobGroupMapping);
            var tCombo = this.up('form').getComponent('field_jobgroup');
            tCombo.setValue(tCombo.getStore().getAt(0).get(tCombo.valueField));
        }
    }
},
{
    itemId: 'field_jobgroup',
    name: 'JobGroup.Id',
    editable: false,
    store: JobGroupMapping,
    xtype: 'combobox',
    fieldLabel: 'JobGroup',
    queryMode: 'local',
    valueField: 'Id',
    displayField: 'Language_Name'
}

此時問題發生了,我在選擇 JobLevel 的這個選項,接著會對應不到 JobGroup 這個選項。

後來我研究與參考了一下網路上的資料,發現有另外一個方法可以解決這問題 -- loadRawData,比較一下這兩個方法,此時才了解連動時必須要注意此情況:

loadRawData

Loads data via the bound Proxy's reader
Use this method if you are attempting to load data and want to utilize the configured data reader

loadData

Loads an array of data straight into the Store.

Using this method is great if the data is in the correct format already (e.g. it doesn't need to be processed by a reader). If your data requires processing to decode the data structure, use a MemoryProxy or loadRawData.

差異就是 loadRawData 會將資料結構解析,所以沒有問題,但使用 loadData 的前提之下必須要資料都在同一層,否則必須要去使用 MemoryProxy 或者 loadRawData。

參考:Extjs store load json data,store fields mapping can't show dataExt.data.StoreView

2014年3月16日 星期日

ASP.NET MVC 4 WebApi 與 Extjs 的結合 -- 兩層複選群組 ( 2 Level CheckBoxGroup )

此文章是 ASP.NET MVC 4 WebApi 與 Extjs 的結合 -- 複選群組 ( CheckBoxGroup ) 做功能上的延伸,兩層代表多層的意思,這裡繼續延伸成縣市地區選擇後,郵遞區號自動帶出,這種功能在許多地方都看得到。

XML 調整

上一篇文章的 XML 資料來源要加上一些細項資料:
<?xml version="1.0" encoding="utf-8" ?>
<zip>
  <city name="基隆市">
    <area name="仁愛區" zipcode="200"></area>
    <area name="信義區" zipcode="201"></area>
    <area name="中正區" zipcode="202"></area>
    <area name="中山區" zipcode="203"></area>
    <area name="安樂區" zipcode="204"></area>
    <area name="暖暖區" zipcode="205"></area>
    <area name="七堵區" zipcode="206"></area>
  </city>
  <city name="台北市">
    <area name="中正區" zipcode="100"></area>
    <area name="大同區" zipcode="103"></area>
    <area name="中山區" zipcode="104"></area>
    <area name="松山區" zipcode="105"></area>
    <area name="大安區" zipcode="106"></area>
    <area name="萬華區" zipcode="108"></area>
    <area name="信義區" zipcode="110"></area>
    <area name="士林區" zipcode="111"></area>
    <area name="北投區" zipcode="112"></area>
    <area name="內湖區" zipcode="114"></area>
    <area name="南港區" zipcode="115"></area>
    <area name="文山區" zipcode="116"></area>
  </city>
  <city name="新北市">
    <area name="萬里區" zipcode="207"></area>
    <area name="金山區" zipcode="208"></area>
    <area name="板橋區" zipcode="220"></area>
    <area name="汐止區" zipcode="221"></area>
    <area name="深坑區" zipcode="222"></area>
    <area name="石碇區" zipcode="223"></area>
    <area name="瑞芳區" zipcode="224"></area>
    <area name="平溪區" zipcode="226"></area>
    <area name="雙溪區" zipcode="227"></area>
    <area name="貢寮區" zipcode="228"></area>
    <area name="新店區" zipcode="231"></area>
    <area name="坪林區" zipcode="232"></area>
    <area name="烏來區" zipcode="233"></area>
    <area name="永和區" zipcode="234"></area>
    <area name="中和區" zipcode="235"></area>
    <area name="土城區" zipcode="236"></area>
    <area name="三峽區" zipcode="237"></area>
    <area name="樹林區" zipcode="238"></area>
    <area name="鶯歌區" zipcode="239"></area>
    <area name="三重區" zipcode="241"></area>
    <area name="新莊區" zipcode="242"></area>
    <area name="泰山區" zipcode="243"></area>
    <area name="林口區" zipcode="244"></area>
    <area name="蘆洲區" zipcode="247"></area>
    <area name="五股區" zipcode="248"></area>
    <area name="八里區" zipcode="249"></area>
    <area name="淡水區" zipcode="251"></area>
    <area name="三芝區" zipcode="252"></area>
    <area name="石門區" zipcode="253"></area>
  </city>
  <city name="桃園縣">
    <area name="中壢市" zipcode="320"></area>
    <area name="平鎮市" zipcode="324"></area>
    <area name="龍潭鄉" zipcode="325"></area>
    <area name="楊梅市" zipcode="326"></area>
    <area name="新屋鄉" zipcode="327"></area>
    <area name="觀音鄉" zipcode="328"></area>
    <area name="桃園市" zipcode="330"></area>
    <area name="龜山鄉" zipcode="333"></area>
    <area name="八德市" zipcode="334"></area>
    <area name="大溪鎮" zipcode="335"></area>
    <area name="復興鄉" zipcode="336"></area>
    <area name="大園鄉" zipcode="337"></area>
    <area name="蘆竹鄉" zipcode="338"></area>
  </city>
  <city name="新竹市">
    <area name="東區" zipcode="300"></area>
    <area name="北區" zipcode="300"></area>
    <area name="香山區" zipcode="300"></area>
  </city>
  <city name="新竹縣">
    <area name="竹北市" zipcode="302"></area>
    <area name="湖口鄉" zipcode="303"></area>
    <area name="新豐鄉" zipcode="304"></area>
    <area name="新埔鎮" zipcode="305"></area>
    <area name="關西鎮" zipcode="306"></area>
    <area name="芎林鄉" zipcode="307"></area>
    <area name="寶山鄉" zipcode="308"></area>
    <area name="竹東鎮" zipcode="310"></area>
    <area name="五峰鄉" zipcode="311"></area>
    <area name="橫山鄉" zipcode="312"></area>
    <area name="尖石鄉" zipcode="313"></area>
    <area name="北埔鄉" zipcode="314"></area>
    <area name="峨眉鄉" zipcode="315"></area>
  </city>
  <city name="苗栗縣">
    <area name="竹南鎮" zipcode="350"></area>
    <area name="頭份鎮" zipcode="351"></area>
    <area name="三灣鄉" zipcode="352"></area>
    <area name="南庄鄉" zipcode="353"></area>
    <area name="獅潭鄉" zipcode="354"></area>
    <area name="後龍鎮" zipcode="356"></area>
    <area name="通霄鎮" zipcode="357"></area>
    <area name="苑裡鎮" zipcode="358"></area>
    <area name="苗栗市" zipcode="360"></area>
    <area name="造橋鄉" zipcode="361"></area>
    <area name="頭屋鄉" zipcode="362"></area>
    <area name="公館鄉" zipcode="363"></area>
    <area name="大湖鄉" zipcode="364"></area>
    <area name="泰安鄉" zipcode="365"></area>
    <area name="銅鑼鄉" zipcode="366"></area>
    <area name="三義鄉" zipcode="367"></area>
    <area name="西湖鄉" zipcode="368"></area>
    <area name="卓蘭鎮" zipcode="369"></area>
  </city>
  <city name="台中市">
    <area name="中區" zipcode="400"></area>
    <area name="東區" zipcode="401"></area>
    <area name="南區" zipcode="402"></area>
    <area name="西區" zipcode="403"></area>
    <area name="北區" zipcode="404"></area>
    <area name="北屯區" zipcode="406"></area>
    <area name="西屯區" zipcode="407"></area>
    <area name="南屯區" zipcode="408"></area>
    <area name="太平區" zipcode="411"></area>
    <area name="大里區" zipcode="412"></area>
    <area name="霧峰區" zipcode="413"></area>
    <area name="烏日區" zipcode="414"></area>
    <area name="豐原區" zipcode="420"></area>
    <area name="后里區" zipcode="421"></area>
    <area name="石岡區" zipcode="422"></area>
    <area name="東勢區" zipcode="423"></area>
    <area name="和平區" zipcode="424"></area>
    <area name="新社區" zipcode="426"></area>
    <area name="潭子區" zipcode="427"></area>
    <area name="大雅區" zipcode="428"></area>
    <area name="神岡區" zipcode="429"></area>
    <area name="大肚區" zipcode="432"></area>
    <area name="沙鹿區" zipcode="433"></area>
    <area name="龍井區" zipcode="434"></area>
    <area name="梧棲區" zipcode="435"></area>
    <area name="清水區" zipcode="436"></area>
    <area name="大甲區" zipcode="437"></area>
    <area name="外埔區" zipcode="438"></area>
    <area name="大安區" zipcode="439"></area>
  </city>
  <city name="彰化縣">
    <area name="彰化市" zipcode="500"></area>
    <area name="芬園鄉" zipcode="502"></area>
    <area name="花壇鄉" zipcode="503"></area>
    <area name="秀水鄉" zipcode="504"></area>
    <area name="鹿港鎮" zipcode="505"></area>
    <area name="福興鄉" zipcode="506"></area>
    <area name="線西鄉" zipcode="507"></area>
    <area name="和美鎮" zipcode="508"></area>
    <area name="伸港鄉" zipcode="509"></area>
    <area name="員林鎮" zipcode="510"></area>
    <area name="社頭鄉" zipcode="511"></area>
    <area name="永靖鄉" zipcode="512"></area>
    <area name="埔心鄉" zipcode="513"></area>
    <area name="溪湖鎮" zipcode="514"></area>
    <area name="大村鄉" zipcode="515"></area>
    <area name="埔鹽鄉" zipcode="516"></area>
    <area name="田中鎮" zipcode="520"></area>
    <area name="北斗鎮" zipcode="521"></area>
    <area name="田尾鄉" zipcode="522"></area>
    <area name="埤頭鄉" zipcode="523"></area>
    <area name="溪州鄉" zipcode="524"></area>
    <area name="竹塘鄉" zipcode="525"></area>
    <area name="二林鎮" zipcode="526"></area>
    <area name="大城鄉" zipcode="527"></area>
    <area name="芳苑鄉" zipcode="528"></area>
    <area name="二水鄉" zipcode="530"></area>
  </city>
  <city name="南投縣">
    <area name="南投市" zipcode="540"></area>
    <area name="中寮鄉" zipcode="541"></area>
    <area name="草屯鎮" zipcode="542"></area>
    <area name="國姓鄉" zipcode="544"></area>
    <area name="埔里鎮" zipcode="545"></area>
    <area name="仁愛鄉" zipcode="546"></area>
    <area name="名間鄉" zipcode="551"></area>
    <area name="集集鎮" zipcode="552"></area>
    <area name="水里鄉" zipcode="553"></area>
    <area name="魚池鄉" zipcode="555"></area>
    <area name="信義鄉" zipcode="556"></area>
    <area name="竹山鎮" zipcode="557"></area>
    <area name="鹿谷鄉" zipcode="558"></area>
  </city>
  <city name="雲林縣">
    <area name="斗南鎮" zipcode="630"></area>
    <area name="大埤鄉" zipcode="631"></area>
    <area name="虎尾鎮" zipcode="632"></area>
    <area name="土庫鎮" zipcode="633"></area>
    <area name="褒忠鄉" zipcode="634"></area>
    <area name="東勢鄉" zipcode="635"></area>
    <area name="台西鄉" zipcode="636"></area>
    <area name="崙背鄉" zipcode="637"></area>
    <area name="麥寮鄉" zipcode="638"></area>
    <area name="斗六市" zipcode="640"></area>
    <area name="林內鄉" zipcode="643"></area>
    <area name="古坑鄉" zipcode="646"></area>
    <area name="莿桐鄉" zipcode="647"></area>
    <area name="西螺鎮" zipcode="648"></area>
    <area name="二崙鄉" zipcode="649"></area>
    <area name="北港鎮" zipcode="651"></area>
    <area name="水林鄉" zipcode="652"></area>
    <area name="口湖鄉" zipcode="653"></area>
    <area name="四湖鄉" zipcode="654"></area>
    <area name="元長鄉" zipcode="655"></area>
  </city>
  <city name="嘉義市">
    <area name="東區" zipcode="600"></area>
    <area name="西區" zipcode="600"></area>
  </city>
  <city name="嘉義縣">
    <area name="番路鄉" zipcode="602"></area>
    <area name="梅山鄉" zipcode="603"></area>
    <area name="竹崎鄉" zipcode="604"></area>
    <area name="阿里山鄉" zipcode="605"></area>
    <area name="中埔鄉" zipcode="606"></area>
    <area name="大埔鄉" zipcode="607"></area>
    <area name="水上鄉" zipcode="608"></area>
    <area name="鹿草鄉" zipcode="611"></area>
    <area name="太保市" zipcode="612"></area>
    <area name="朴子市" zipcode="613"></area>
    <area name="東石鄉" zipcode="614"></area>
    <area name="六腳鄉" zipcode="615"></area>
    <area name="新港鄉" zipcode="616"></area>
    <area name="民雄鄉" zipcode="621"></area>
    <area name="大林鎮" zipcode="622"></area>
    <area name="溪口鄉" zipcode="623"></area>
    <area name="義竹鄉" zipcode="624"></area>
    <area name="布袋鎮" zipcode="625"></area>
  </city>
  <city name="台南市">
    <area name="中西區" zipcode="700"></area>
    <area name="東區" zipcode="701"></area>
    <area name="南區" zipcode="702"></area>
    <area name="北區" zipcode="704"></area>
    <area name="安平區" zipcode="708"></area>
    <area name="安南區" zipcode="709"></area>
    <area name="永康區" zipcode="710"></area>
    <area name="歸仁區" zipcode="711"></area>
    <area name="新化區" zipcode="712"></area>
    <area name="左鎮區" zipcode="713"></area>
    <area name="玉井區" zipcode="714"></area>
    <area name="楠西區" zipcode="715"></area>
    <area name="南化區" zipcode="716"></area>
    <area name="仁德區" zipcode="717"></area>
    <area name="關廟區" zipcode="718"></area>
    <area name="龍崎區" zipcode="719"></area>
    <area name="官田區" zipcode="720"></area>
    <area name="麻豆區" zipcode="721"></area>
    <area name="佳里區" zipcode="722"></area>
    <area name="西港區" zipcode="723"></area>
    <area name="七股區" zipcode="724"></area>
    <area name="將軍區" zipcode="725"></area>
    <area name="學甲區" zipcode="726"></area>
    <area name="北門區" zipcode="727"></area>
    <area name="新營區" zipcode="730"></area>
    <area name="後壁區" zipcode="731"></area>
    <area name="白河區" zipcode="732"></area>
    <area name="東山區" zipcode="733"></area>
    <area name="六甲區" zipcode="734"></area>
    <area name="下營區" zipcode="735"></area>
    <area name="柳營區" zipcode="736"></area>
    <area name="鹽水區" zipcode="737"></area>
    <area name="善化區" zipcode="741"></area>
    <area name="大內區" zipcode="742"></area>
    <area name="山上區" zipcode="743"></area>
    <area name="新市區" zipcode="744"></area>
    <area name="安定區" zipcode="745"></area>
  </city>
  <city name="高雄市">
    <area name="新興區" zipcode="800"></area>
    <area name="前金區" zipcode="801"></area>
    <area name="苓雅區" zipcode="802"></area>
    <area name="鹽埕區" zipcode="803"></area>
    <area name="鼓山區" zipcode="804"></area>
    <area name="旗津區" zipcode="805"></area>
    <area name="前鎮區" zipcode="806"></area>
    <area name="三民區" zipcode="807"></area>
    <area name="楠梓區" zipcode="811"></area>
    <area name="小港區" zipcode="812"></area>
    <area name="左營區" zipcode="813"></area>
    <area name="仁武區" zipcode="814"></area>
    <area name="大社區" zipcode="815"></area>
    <area name="岡山區" zipcode="820"></area>
    <area name="路竹區" zipcode="821"></area>
    <area name="阿蓮區" zipcode="822"></area>
    <area name="田寮區" zipcode="823"></area>
    <area name="燕巢區" zipcode="824"></area>
    <area name="橋頭區" zipcode="825"></area>
    <area name="梓官區" zipcode="826"></area>
    <area name="彌陀區" zipcode="827"></area>
    <area name="永安區" zipcode="828"></area>
    <area name="湖內區" zipcode="829"></area>
    <area name="鳳山區" zipcode="830"></area>
    <area name="大寮區" zipcode="831"></area>
    <area name="林園區" zipcode="832"></area>
    <area name="鳥松區" zipcode="833"></area>
    <area name="大樹區" zipcode="840"></area>
    <area name="旗山區" zipcode="842"></area>
    <area name="美濃區" zipcode="843"></area>
    <area name="六龜區" zipcode="844"></area>
    <area name="內門區" zipcode="845"></area>
    <area name="杉林區" zipcode="846"></area>
    <area name="甲仙區" zipcode="847"></area>
    <area name="桃源區" zipcode="848"></area>
    <area name="那瑪夏區" zipcode="849"></area>
    <area name="茂林區" zipcode="851"></area>
    <area name="茄萣區" zipcode="852"></area>
  </city>
  <city name="屏東縣">
    <area name="屏東市" zipcode="900"></area>
    <area name="三地門鄉" zipcode="901"></area>
    <area name="霧台鄉" zipcode="902"></area>
    <area name="瑪家鄉" zipcode="903"></area>
    <area name="九如鄉" zipcode="904"></area>
    <area name="里港鄉" zipcode="905"></area>
    <area name="高樹鄉" zipcode="906"></area>
    <area name="鹽埔鄉" zipcode="907"></area>
    <area name="長治鄉" zipcode="908"></area>
    <area name="麟洛鄉" zipcode="909"></area>
    <area name="竹田鄉" zipcode="911"></area>
    <area name="內埔鄉" zipcode="912"></area>
    <area name="萬丹鄉" zipcode="913"></area>
    <area name="潮州鎮" zipcode="920"></area>
    <area name="泰武鄉" zipcode="921"></area>
    <area name="來義鄉" zipcode="922"></area>
    <area name="萬巒鄉" zipcode="923"></area>
    <area name="崁頂鄉" zipcode="924"></area>
    <area name="新埤鄉" zipcode="925"></area>
    <area name="南州鄉" zipcode="926"></area>
    <area name="林邊鄉" zipcode="927"></area>
    <area name="東港鎮" zipcode="928"></area>
    <area name="琉球鄉" zipcode="929"></area>
    <area name="佳冬鄉" zipcode="931"></area>
    <area name="新園鄉" zipcode="932"></area>
    <area name="枋寮鄉" zipcode="940"></area>
    <area name="枋山鄉" zipcode="941"></area>
    <area name="春日鄉" zipcode="942"></area>
    <area name="獅子鄉" zipcode="943"></area>
    <area name="車城鄉" zipcode="944"></area>
    <area name="牡丹鄉" zipcode="945"></area>
    <area name="恆春鎮" zipcode="946"></area>
    <area name="滿州鄉" zipcode="947"></area>
  </city>
  <city name="台東縣">
    <area name="台東市" zipcode="950"></area>
    <area name="綠島鄉" zipcode="951"></area>
    <area name="蘭嶼鄉" zipcode="952"></area>
    <area name="延平鄉" zipcode="953"></area>
    <area name="卑南鄉" zipcode="954"></area>
    <area name="鹿野鄉" zipcode="955"></area>
    <area name="關山鎮" zipcode="956"></area>
    <area name="海端鄉" zipcode="957"></area>
    <area name="池上鄉" zipcode="958"></area>
    <area name="東河鄉" zipcode="959"></area>
    <area name="成功鎮" zipcode="961"></area>
    <area name="長濱鄉" zipcode="962"></area>
    <area name="太麻里鄉" zipcode="963"></area>
    <area name="金峰鄉" zipcode="964"></area>
    <area name="大武鄉" zipcode="965"></area>
    <area name="達仁鄉" zipcode="966"></area>
  </city>
  <city name="花蓮縣">
    <area name="花蓮市" zipcode="970"></area>
    <area name="新城鄉" zipcode="971"></area>
    <area name="秀林鄉" zipcode="972"></area>
    <area name="吉安鄉" zipcode="973"></area>
    <area name="壽豐鄉" zipcode="974"></area>
    <area name="鳳林鎮" zipcode="975"></area>
    <area name="光復鄉" zipcode="976"></area>
    <area name="豐濱鄉" zipcode="977"></area>
    <area name="瑞穗鄉" zipcode="978"></area>
    <area name="萬榮鄉" zipcode="979"></area>
    <area name="玉里鎮" zipcode="981"></area>
    <area name="卓溪鄉" zipcode="982"></area>
  </city>
  <city name="宜蘭縣">
    <area name="宜蘭市" zipcode="260"></area>
    <area name="頭城鎮" zipcode="261"></area>
    <area name="礁溪鄉" zipcode="262"></area>
    <area name="壯圍鄉" zipcode="263"></area>
    <area name="員山鄉" zipcode="264"></area>
    <area name="羅東鎮" zipcode="265"></area>
    <area name="三星鄉" zipcode="266"></area>
    <area name="大同鄉" zipcode="267"></area>
    <area name="五結鄉" zipcode="268"></area>
    <area name="冬山鄉" zipcode="269"></area>
    <area name="蘇澳鎮" zipcode="270"></area>
    <area name="南澳鄉" zipcode="272"></area>
  </city>
  <city name="澎湖縣">
    <area name="馬公市" zipcode="880"></area>
    <area name="西嶼鄉" zipcode="881"></area>
    <area name="望安鄉" zipcode="882"></area>
    <area name="七美鄉" zipcode="883"></area>
    <area name="白沙鄉" zipcode="884"></area>
    <area name="湖西鄉" zipcode="885"></area>
  </city>
  <city name="金門縣">
    <area name="金沙鎮" zipcode="890"></area>
    <area name="金湖鎮" zipcode="891"></area>
    <area name="金寧鄉" zipcode="892"></area>
    <area name="金城鎮" zipcode="893"></area>
    <area name="烈嶼鄉" zipcode="894"></area>
    <area name="烏坵鄉" zipcode="896"></area>
  </city>
  <city name="連江縣">
    <area name="南竿鄉" zipcode="209"></area>
    <area name="北竿鄉" zipcode="210"></area>
    <area name="莒光鄉" zipcode="211"></area>
    <area name="東引鄉" zipcode="212"></area>
  </city>
</zip>

先將來源資料讀取成 array 的函式調整一下:
var a_zip = [];

$.ajax({
    url: 'http://localhost:8090/Content/xml/zipcode.xml',
    dataType: 'xml',
    error: function () { alert('失敗'); },
    success: function (xml) {
        var cityIndex = 0;
        $(xml).find('city').each(function () {
            var city_name = $(this).attr('name');

            var t_area = [];
            var areaIndex = 0;

            /* 讀取 city 下 area 資料 */
            $(this).find('area').each(function () {
                var area_name = $(this).attr('name');
                var area_zipcode = $(this).attr('zipcode');

                t_area[areaIndex] = {
                    area_name: area_name,
                    area_zipcode: area_zipcode
                };

                areaIndex ++;
            });

            a_zip[cityIndex] = {
                city_name: city_name,
                index: cityIndex,
                /* 將 area 資料放在此 */
                area: t_area
            };

            cityIndex++;
        });
        init();
    }
});

介面

在顯示介面上,我將它改為三格,分別顯示郵遞區號、城市、地區
<input id="targetZipCode" style="width: 35px;" type="text" />
<input id="targetCity" style="width: 60px;" type="text" />
<input id="targetArea" style="width: 60px;" type="text" />
<span id="targetButton"></span>


Button

此處在修改時必須多設置一個變數 subWindowIsDisplay,判斷子視窗是否在顯示情況。

在按鈕的 mouseover 事件中,母視窗在顯示時機必須多判斷 subWindowIsDisplay 這個變數,所以整個 Button 的程式碼如下
var subWindowIsDisplay = false;

var button = Ext.create('Ext.Button', {
    text: '選擇縣市',
    renderTo: 'targetButton',
    listeners: {
        mouseover: {
            fn: function () {
                if (!this.mousedOver) {

                    buttonIsDisplay = true;
                    var tempSelf = this;
                    var tempPosition = tempSelf.getPosition();
                    // X 軸位置
                    tempPosition[0] += 100;
                    // Y 軸位置
                    tempPosition[1] -= 50;
                    locationWinF.setPosition(tempPosition);
                    locationWinF.show();
                }
            },
            
            // delay: 2000
        },
        mouseout: {
            fn: function () {
                buttonIsDisplay = false;
                
                if (!buttonIsDisplay && !windowIsDisplay && !subWindowIsDisplay) {
                    locationWinS.hide();
                    locationWinF.hide();
                }
            },
            delay: 500
        },
    }
});

windows

在 Windows 的 mouseleave 事件也要稍微做修改
listeners: {
    afterrender: function(win) {
        win.mon(win.el, {
            mouseover: {
                fn: function () {

                    if (!this.mousedOver) {
                        
                        windowIsDisplay = true;
                        locationWinF.show();
                    }
                }
            },
            mouseleave: {
                fn: function () {
                    windowIsDisplay = false;
                    
                    if (!buttonIsDisplay && !windowIsDisplay && !subWindowIsDisplay) {
                        locationWinF.hide();
                        locationWinS.hide();
                    }
                },
                delay: 500
            }
        });
    }

},

Windows 針對每一個選項都設置一個 mouseover 的事件,當滑鼠移到選項上,就必須帶出該城市下的地區,剛剛上面程式碼已經有將此轉換成物件了,在 a_zip[tIndex].area 下, locationWinS 為子視窗物件、townMenu 為城市控制項 ID,稍後會提到。


items: [
    {
        id: 'taiwanCity',
        xtype: 'checkboxgroup',
        fieldLabel: '台灣地區',
        labelAlign: 'top',
        columns: 4,
        vertical: true,
        defaults: {
            width: 150,
            listeners: {
                afterrender: function () {
                    var tempSelf = this;
                    tempSelf.getEl().on('mouseout', function () {
                        if (!tempSelf.checked) {
                            tempSelf.getEl().setStyle('background-color', '')
                        }
                    });
                    tempSelf.getEl().on('mouseover', function () {
                        tempSelf.getEl().setStyle('background-color', 'cornflowerblue')
                        var tempPosition = tempSelf.getPosition();

                        clearTimeout(colock);
                        colock = setTimeout(function () {
                            
                            if (cityValue != tempSelf.inputValue) {
                                tempPosition[0] += 100;
                                tempPosition[1] -= 50;
                                locationWinS.setPosition(tempPosition);
                                cityValue = tempSelf.inputValue;
                                var tIndex = cityValue;
                                Ext.getCmp('townMenu').removeAll();
                                for (var i = 0; i < a_zip[tIndex].area.length; i++) {
                                    Ext.getCmp('townMenu').add({ boxLabel: a_zip[tIndex].area[i].area_name, name: 'TownId', inputValue: i })
                                }
                            }
                            locationWinS.show();
                        }, 100)
                    });
                }
            }
        }
    
    }
]

sub windows

子視窗要做的事情就是在選項被點擊後,將資料帶到文字欄位內。
var locationWinS = Ext.create('widget.window', {
    header: false,
    style: {
        borderStyle: 'none',
    },
    closable: false,
    closeAction: 'hide',
    items: [
        {
            padding: '10 25 10 25',
            border: false,
            items: [
                {
                    id: 'townMenu',
                    xtype: 'checkboxgroup',
                    columns: 2,
                    vertical: true,
                    defaults: {
                        width: 110,
                        listeners: {

                            afterrender: function () {
                                var tempSelf = this;
                                tempSelf.getEl().on('mouseout', function () {
                                    if (!tempSelf.checked) {
                                        tempSelf.getEl().setStyle('background-color', '')
                                    }

                                });

                                tempSelf.getEl().on('mouseleave', function () {
                                    subWindowIsDisplay = false;
                                });
                                tempSelf.getEl().on('mouseover', function () {
                                    tempSelf.getEl().setStyle('background-color', 'cornflowerblue')

                                    subWindowIsDisplay = true;
                                    

                                }, 500);

                                this.getEl().on('click', function () {

                                    $('#targetZipCode').val(
                                        a_zip[cityValue].area[tempSelf.inputValue].area_zipcode
                                        );
                                    $('#targetCity').val(a_zip[cityValue].city_name);
                                    $('#targetArea').val(a_zip[cityValue].area[tempSelf.inputValue].area_name);

                                    cityValue = -1;
                                    locationWinF.hide();
                                    locationWinS.hide();
                                    
                                });
                            }
                        }
                    }
                }
            ]
        }
    ]

});

最後執行後畫面如下


2014年3月13日 星期四

ASP.NET MVC 4 WebApi Put 時資料無法更新之問題

今天我在做資料更新時,將資料傳送到 API Put 內,再將資料更新,如以下程式碼:
public HttpResponseMessage Put(Employee employee)
{
    if (ModelState.IsValid)
    {
        employee.Company = db.Company.Find(employee.Company.CompanyId);
        
        // ... 更多的關聯表

        db.Entry(employee).State = EntityState.Modified;       

        try
        {
            db.SaveChanges();
        }
        catch (DbUpdateConcurrencyException ex)
        {
            return Request.CreateErrorResponse(HttpStatusCode.NotFound, ex);
        }
    }
    else
    {
        return Request.CreateErrorResponse(HttpStatusCode.BadRequest, ModelState);
    }

    return Request.CreateResponse(HttpStatusCode.OK);
}

因為在頁面上是使用 Extjs,所以在資料傳送過來時,關聯的資料只會有 Key 值,必需再去與資料庫要被關聯的完整資料,要不然資料將會被自動新增,會多了筆垃圾資料,多做幾次就會有幾筆,所以必須得在與資料庫要一次。

此時問題來了,在我將頁面上資料送到 Put 時,發現 Employee 中的資料可以被更新,但是 Employee 關聯的表的 ID 沒有被更新。

什麼???!! 這是什麼情況。

參考了許多資料:EntityState 列舉型別ObjectStateEntry 類別EDM的一些常见处理数据操作MVC3+EF4.1学习系列(二)-------基础的增删改查和持久对象的生命周期变化Entity Framework 4.1 Code First学习之路(二)EntityFrameworkAdd方法与Attach区别

後來我觀察了一下,在 Put 一進來時 db.Entry(employee).State 為 Detached ( 意思是不在 Context 裡,沒有被追蹤 ),接著我將程式碼改為:
// 將狀態改為 Unchanged,也就是將它附加到 Context 內
db.Employee.Attach(employee); 
// 將狀態改為 Modified
db.Entry(employee).State = EntityState.Modified;

結果還是一樣.....這我就看不懂了,找了許多範例都是這樣,都沒有看到資料在 Put 進來之後,還有做修改的。但後來看到一篇文章 Working With Entity Framework Detached Objects
先搜尋出該筆資料塞進另一個實體,再將此實體加入關聯的表的資料,接著使用 Entry().CurrentValues.SetValues() 將修改過的資料塞到實體,最後在更新。

程式碼如下:
public HttpResponseMessage Put(Employee employee)
{
    if (ModelState.IsValid)
    {
        Employee _employee = db.Employee.Find(employee.EmployeeId, employee.EffectiveDate);

        _employee.Company = db.Company.Find(employee.Company.CompanyId);

        // ... 更多關聯表        

        db.Entry(_employee).CurrentValues.SetValues(employee);

        try
        {
            db.SaveChanges();
        }
        catch (DbUpdateConcurrencyException ex)
        {
            return Request.CreateErrorResponse(HttpStatusCode.NotFound, ex);
        }
    }
    else
    {
        return Request.CreateErrorResponse(HttpStatusCode.BadRequest, ModelState);
    }

    return Request.CreateResponse(HttpStatusCode.OK);
}

程式碼改為這樣就可以更新了,重新建立一個實體去找出資料庫最新的資料 ( 狀態為 Unchanged ),再將所有修改過的值原封不動的設定到實體上 ( 狀態為 Modified ),最後在送到資料庫去更新,這樣就解決問題了。

2014年3月10日 星期一

安裝 Visual Studio 2013 所遇到狀況解決方案

我本來已經有安裝 Visual Studio 2012,但是為了比較差別,所以要安裝 Visual Studio 2013,以下就是我在安裝 Visual Studio 2013 所遇到的狀況。

建議升級 Windows 8.1

因為本人電腦為 Windows 8,但我在開啟 Visual Studio 2013 要安裝時,建議我要先升級為 Windows 8.1,否則某些功能不能使用,所以我就先將 Windows 8 升級為 Windows 8.1。

參考:Windows 8升級為Windows 8.1

安裝 Visual Studio 2013

如果沒有特殊需求,請使用「傻瓜安裝法」完成安裝。

參考:取得並安裝 Visual Studio 2013 內附圖文教學!!

安裝 SQL Server Data Tools

在我以為安裝完 Visual Studio 2013 的沒多久,用回 Visual Studio 2012 就發生伺服器總管內資料庫不能讀取 ( 在 Visual Studio 2013 不會有此狀況 ),發生以下錯誤


後來找了一下論壇有人碰到相同情況 Data Tools is not compatible in Visual Studio,是要安裝 SSDT ( SQL Server Data Tools ) 才能恢復正常。

SQL Server Data Tools 下載並安裝:


此時,又發生錯誤.....


與目前的系統時鐘或簽署檔案的時間戳記核對時,所需的憑證不在有效日期內

此時心中浮現一個字........好!!!!

後來又 google 了一下,找到兩篇說明 Visual Studio 2012 安裝程式: 常見的問題和因應措施Visual Studio 2012 在 2013 年 10 月 7 日之後可能無法安裝 ,結果是必須要去下載 Visual Studio 2012 的更新包 ( 目前是 Update 4 ),位置在 http://www.visualstudio.com/zh-tw/downloads#d-additional-software,才能再安裝 SQL Server Data Tools。


安裝完成後,再安裝 SQL Server Data Tools ( 其中不要執行 Visual Studio 任何版本 ),最後執行 Visual Studio 2012 可以開啟伺服器總管的資料庫內的資料表了。

ASP.NET MVC 4 WebApi 與 Extjs 的結合 -- 一個Form同時上傳Data與File

在閱讀此文章前,請先參考
ASP.NET MVC 4 WebApi 與 Extjs 的結合 -- 送出表單 ( Submit Form )
ASP.NET MVC 4 WebApi 與 Extjs 的結合 -- 動態複製表單並送出
ASP.NET MVC 4 WebApi 與 Extjs 的結合 -- 上傳檔案 ( FileUpload )

為了避免網路或其他因素造成只成功上傳某些資料,所以需要將Form跟File上傳到同一個WebApi做資料儲存

同時上傳資料與檔案,Controller無法自動區分Form跟File丟到指定的Model裡面,所以我們需要對傳上來的資料做處理。
每次傳上來的資料類別不同,做成共用的Method讓大部分的狀況都可以直接使用,而且自動轉成我們所指定的型別。

先把Request.Form傳進去,用Keys跑迴圈把Value放到Dictionary去,因為我們需要自動轉換型別,先把Dictionary轉成Json格式,然後讓JsonConvert.DeserializeObject<T>去幫我們做型別轉換的處理。
備註:Key跟欄位名稱要一樣,多的Key不會被放到Model,沒有資料的欄位會是null。
public T getSingleFormData<T>(NameValueCollection Form)
{
  List<T> Data = new List<T>();
  Dictionary<string, object> tmpData = new Dictionary<string, object>();
  foreach (var item in Form.AllKeys)
  {
    tmpData.Add(item, Form[item]);
  }
  if (tmpData.Count > 0)
  {
    T formData = JsonConvert.DeserializeObject<T>(JsonConvert.SerializeObject(tmpData));
    Data.Add(formData);
  }
  return Data.FirstOrDefault();
}

看完單筆資料接收,當然有可能資料是多筆,這邊需要做傳過來的Key做切割,然後判斷這是第幾筆資料,所以要對AllKeys做排序,避免傳過來的順序亂掉導致轉換後是錯誤的資料。
public List<T> getMultiFormData<T>(NameValueCollection Form)
{
  List<T> Datas = new List<T>();
  Dictionary<string, object> tmpData = new Dictionary<string, object>();
  string Seq = string.Empty;
  foreach (var item in Form.AllKeys.OrderBy(x => x))
  {
    string[] formName = item.Split('.');
    string formSeq = formName[0].Substring(1, formName[0].Length - 2);
    if (string.IsNullOrEmpty(Seq) == false && Seq != formSeq)
    {
      if (tmpData.Count > 0)
      {
        T formData = JsonConvert.DeserializeObject<T>(JsonConvert.SerializeObject(tmpData));
        Datas.Add(formData);
      }
      tmpData.Clear();
    }
    Seq = formSeq;
    tmpData.Add(formName[1], Form[item]);
  }

  if (tmpData.Count > 0)
  {
    T formData = JsonConvert.DeserializeObject<T>(JsonConvert.SerializeObject(tmpData));
    Datas.Add(formData);
  }
  return Datas;
}

接下來做檔案的接收,因為直接把檔案存到資料庫,所以用Stream去存放。
public IDictionary<string, object> getFileData(HttpFileCollection Files)
{
  Dictionary<string, object> FilesStream = new Dictionary<string, object>();
  foreach (var item in Files.AllKeys)
  {
    HttpPostedFile File = Files[item];
    if (string.IsNullOrEmpty(File.FileName) == false)
    {
      Dictionary<string, object> tmpFile = new Dictionary<string, object>();
      tmpFile.Add("FileName", File.FileName);
      tmpFile.Add("Stream", File.InputStream);
      FilesStream.Add(item, tmpFile);
    }
  }
  return FilesStream;
}

Method都寫完,開始動手寫資料處理的部分。
public HttpResponseMessage Post()
{
  var httpRequest = HttpContext.Current.Request;
  //多筆
  List<Products> AllProducts = getMultiFormData<Products>(httpRequest.Form);
  /*
  Code
  */

  //單筆
  Products Products = getSingleFormData<Products>(httpRequest.Form);
  /*
   Code
   */

  //檔案
  IDictionary<string, object> Files = getFileData(httpRequest.Files);
  foreach (var item in Files)
  {
    Dictionary<string, object> tmpFile = (Dictionary<string, object>)item.Value;
   /*
    Code
    */
  }
  return Request.CreateResponse(HttpStatusCode.OK);
}

David Kuo
為什麼要傳參數,而不在Method直接取Request?

答:
如果從Method直接取Request,這樣不夠彈性,變成其他NameValueCollection、HttpFileCollection的資料要取就會沒辦法使用,然後也有可能在建立共用物件時發生Request未初始化的問題。
參考:
ASP.NET MVC 4 Web Api 回傳HttpResponseMessage遇到 System.ArgumentNullException: Value cannot be null. Parameter name: request

2014年3月7日 星期五

ASP.NET MVC 4 WebApi 與 Extjs 的結合 -- 複選群組 ( CheckBoxGroup )

此篇文章要利用 Extjs 要讀取 xml 檔案,使用 CheckBoxGroup 來顯示其中的資料,當然,可以把此檔案想像成是 API。

在這邊是以台灣各縣市的名稱為例,做一個文字欄位 ( text ) 與按鈕 ( button ),移到按鈕上方會自動顯示 checkboxgroup,如果滑鼠離開 checkboxgroup 會自動隱藏,而選取 checkboxgroup 內選項時,則會將結果顯示在文字欄位中。

其實這與人力銀行的在某些功能很像,接下來會說明如何使用 checkboxgroup 來建立此功能。

XML 建置與讀取

先建立要讀取出來的資料。
<?xml version="1.0" encoding="utf-8" ?>
<zip>
  <city name="基隆市">  </city>
  <city name="台北市">  </city>
  <city name="新北市">  </city>
  <city name="桃園縣">  </city>
  <city name="新竹市">  </city>
  <city name="新竹縣">  </city>
  <city name="苗栗縣">  </city>
  <city name="台中市">  </city>
  <city name="彰化縣">  </city>
  <city name="南投縣">  </city>
  <city name="雲林縣">  </city>
  <city name="嘉義市">  </city>
  <city name="嘉義縣">  </city>
  <city name="台南市">  </city>
  <city name="高雄市">  </city>
  <city name="屏東縣">  </city>
  <city name="台東縣">  </city>
  <city name="花蓮縣">  </city>
  <city name="宜蘭縣">  </city>
  <city name="澎湖縣">  </city>
  <city name="金門縣">  </city>
  <city name="連江縣">  </city>
</zip>

將內容讀取並存成 array 型態,方便讀取。
var a_zip = [];

$.ajax({
    url: 'http://localhost:8090/Content/xml/zipcode.xml',
    dataType: 'xml',
    error: function () { alert('失敗'); },
    success: function (xml) {
        var cityIndex = 0;
        $(xml).find('city').each(function () {
            var city_name = $(this).attr('name');
            a_zip[cityIndex] = {
                city_name: city_name,
                index: cityIndex
            };
            cityIndex++;
        });
        init();
    }
});

以上有呼叫 init 函式,init 程式碼為:
function init() {
    Ext.onReady(function () {
        // ...
    });
}
這是因為需要等到資料讀取完畢後,才能執行 onReady,不然建構時期發現沒有資料,會產生錯誤。

文字欄位與按鈕

在頁面上建立一個 input, ID 為 targetText 的文字欄位與一個 span,ID 為 targetButton 的按鈕
<input id="targetText" type="text" />
<span id="targetButton"></span>

checkgroup

使用 window 將 checkboxgroup 所有選項包在同一個控制項內,這樣一來只需要對此控制項做隱藏或顯示即可。

因為我們要將它自動隱藏或顯示,則需要將 window 屬性 closable 調整為 false,而在選取時也要將 checkgroup 目前所有選取項目的值,顯示在文字欄位中。

var locationWinF = Ext.create('widget.window', {
    title: '地區選單',
    header: {
        titlePosition: 2,
        titleAlign: 'center'
    },
    style: {
        borderStyle: 'none',
    },
    closable: false,
    items: [
        {
            padding: '10 25 10 25',
            items: [
                {
                    id: 'taiwanCity',
                    xtype: 'checkboxgroup',
                    fieldLabel: '台灣地區',
                    labelAlign: 'top',
                    columns: 4,
                    vertical: true,
                    defaults: {
                        width: 150,
                        listeners: {
                            afterrender: function () {
                                var tempSelf = this;

                                tempSelf.getEl().on('click', function () {
                                    var checkedItem = Ext.getCmp('taiwanCity').getChecked();
                                    var text = '';
                                    Ext.Array.each(checkedItem, function (item) {
                                        text += text == '' ? item.boxLabel : ', ' + item.boxLabel;
                                        
                                    });
                                    $('#targetText').val(text);
                                });
                            }
                        }
                    },
                    items: [
                    ]
                }
            ]
        }
    ]
});

接著要將 array 資料讀取到 checkboxgroup 內
for (var i = 0; i < a_zip.length; i++) {
    Ext.getCmp('taiwanCity').add({ boxLabel: a_zip[i].city_name, inputValue: a_zip[i].index });
}

checkgroup 顯示與隱藏

顯示與隱藏時機,必須使用 window 的 mouseover、mouseleave 事件和 button 的 mouseout、mouseover 的事件,設定兩個全域變數 buttonIsDisplay、windowIsDisplay,來決定 window 是否需要顯示。 button 的事件程式碼:
var button = Ext.create('Ext.Button', {
    text: '選擇縣市',
    renderTo: 'targetButton', // Ext.getBody(),
    listeners: {
        mouseover: {
            fn: function () {
                if (!this.mousedOver) {

                    buttonIsDisplay = true;
                    var tempSelf = this;
                    var tempPosition = tempSelf.getPosition();
                    // X 軸位置
                    tempPosition[0] += 100;
                    // Y 軸位置
                    tempPosition[1] -= 50;
                    locationWinF.setPosition(tempPosition);
                    locationWinF.show();
                }
            }
        },
        mouseout: {
            fn: function () {
                buttonIsDisplay = false;
                console.log(buttonIsDisplay + ' ' + windowIsDisplay);
                if (!buttonIsDisplay && !windowIsDisplay) {
                    locationWinF.hide();
                }
            },
            delay: 500
        },
    },
    handler: function () {
        targetId = 'targetText';

    }
});
window 的事件程式碼:
listeners: {
        afterrender: function(win) {
            win.mon(win.el, {
                mouseover: {
                    fn: function () {

                        if (!this.mousedOver) {
                            
                            windowIsDisplay = true;
                            locationWinF.show();
                        }
                    }
                },
                mouseleave: {
                    fn: function () {
                        windowIsDisplay = false;
                        if (!buttonIsDisplay && !windowIsDisplay)
                            locationWinF.hide();
                    },
                    delay: 500
                }
            });
        }

    },
最後執行後的畫面如下:


2014年3月4日 星期二

ASP.NET MVC 4 WebApi 與 Extjs 的結合 -- 列表操作列 ( Action Column )

此篇文章延伸 ASP.NET MVC 4 WebApi 與 Extjs 的結合 -- 列表 ( List ) 繼續做列表操作列的功能加強。

通常這種操作列 ( Action Column ) 通常使用在單行資料更新或資料刪除,與小弟在 2012 年發布的 GridView 新增、刪除、修改以及排序 功能是非常類似的,只是這是純 ASP.NET 控制項與事件做出來的,而該篇文章是要利用 ASP.NET MVC 4 WebApi 與 Extjs 做出相同的功能。

actioncolumn

在 items 內多加一個欄位,xtype 為 actioncolumn,在此就先多加一個更新和刪除的按鈕:
{
    text: 'ActionColumn',
    flex: 0.5,
    xtype: 'actioncolumn',
    menuDisabled: true,
    renderer: function (value, metadata, record, rowIndex, columnIndex) {

    },
    items: [
        {
            icon: '/Images/Icons/note-add.png',
            tooltip: '加',
            scope: this,
            handler: function (grid, rowIndex, colIndex) {
                
            }
        },
        { weight: 10 },
        {
            icon: '/Images/Icons/del.png',
            tooltip: '刪除',
            scope: this,
            handler: function (grid, rowIndex, colIndex) {
               
            }
        },
    ]
},

執行後畫面如下

renderer

此功能可以格式化該列的資料格式或者是按照自定義的 HTML 顯示最後的樣板。
在 renderer 加上,將 LastName 為 '哈哈' 的按鈕圖示改為 pig.png
renderer: function (value, metadata, record, rowIndex, columnIndex) {
    if (record.get('LastName') == '哈哈') {
        gridPanel.columns[columnIndex].items[0].icon = '/Images/Icons/pig.png';
    }
},
而在其中一個按鈕加上在按鈕按下時,將 LastName 改為 '哈哈' 的功能:
{
    icon: '/Images/Icons/note-add.png',
    tooltip: '加',
    scope: this,
    handler: function (grid, rowIndex, colIndex) {
        rec.set('LastName', '哈哈');
        
    }
},

執行後點擊按鈕圖示就會改變為如以下圖

更新與刪除

更新與刪除兩個按鈕可以結合 WebApi 達到不像以往 ASP.NET 做完後還必須 ReLoad 才做完事件內容,而是按下後並無任何畫面跳動就會將資料用 ajax 送到 API 後處理,頁面上則是將該筆資料保留或移除,其實是只做 HTML 上的保留或移除;然而在重新整理畫面後,資料因為更新或移除了,所以讀到的也會是最新的資料。

首先要準備 API,刪除與更新:
public HttpResponseMessage Put(int id, Employees employee)
{
    if (!ModelState.IsValid)
    {
        return Request.CreateErrorResponse(HttpStatusCode.BadRequest, ModelState);
    }

    if (id != employee.EmployeeID)
    {
        return Request.CreateResponse(HttpStatusCode.BadRequest);
    }

    db.Entry(employee).State = EntityState.Modified;

    try
    {
        db.SaveChanges();
    }
    catch (DbUpdateConcurrencyException ex)
    {
        return Request.CreateErrorResponse(HttpStatusCode.NotFound, ex);
    }

    return Request.CreateResponse(HttpStatusCode.OK);
}

public HttpResponseMessage Delete(int id)
{
    Employees employee = db.Employees.Find(id);
    if (employee == null)
    {
        return Request.CreateResponse(HttpStatusCode.NotFound);
    }

    db.Employees.Remove(employee);

    try
    {
        db.SaveChanges();
    }
    catch (DbUpdateConcurrencyException ex)
    {
        return Request.CreateErrorResponse(HttpStatusCode.NotFound, ex);
    }

    return Request.CreateResponse(HttpStatusCode.OK, employee);
}

在畫面上可以這樣設定
{
    icon: '/Images/Icons/note-add.png',
    tooltip: '加',
    scope: this,
    handler: function (grid, rowIndex, colIndex) {
        var rec = grid.getStore().getAt(rowIndex);
        rec.set('Photo', '')

        $.ajax({
            url: 'http://localhost/api/Employee/Put?id=' + rec.get('EmployeeID'),
            data: rec.data,
            type: 'PUT',
            error: function () { alert('Error!!'); },
            success: function () {
                alert('更新成功');
            }
        });
        
    }
},
{ weight: 10 },
{
    icon: '/Images/Icons/del.png',
    tooltip: '刪除',
    scope: this,
    handler: function (grid, rowIndex, colIndex) {
        var rec = grid.getStore().getAt(rowIndex);
        console.log(rec);

        $.ajax({
            url: 'http://localhost/api/Employee/Delete?id=' + rec.get('EmployeeID'),
            type: 'DELETE',
            error: function () { alert('Error!!'); },
            success: function () {
                alert('刪除成功');
            }
        });
        
        // 畫面上移除該列
        grid.getStore().removeAt(rowIndex);

    }
},

執行後按下刪除或更新在 API 都接收到值:

按鈕失效

通常有些情況下,必須要讓按鈕失效,例如產品與產品分類的關係,在編輯產品分類的畫面中,若是產品分類底下還有產品,則不能將產品分類刪除,必須等到產品分類下沒有產品了才能刪除,要不然在開啟產品頁面時,則會對應不到產品分類。上面的例子或許舉得不好,但是有更多種情況必須要將某些按鈕失效,不然會對資料或系統造成錯誤的問題。

在 Extjs 中,使用 isDisabled 屬性,並依照該列顯示或隱藏的資料判斷此按鈕是否失效,順便一提,在頁面上無法完全擋住使用者按下按鈕,所以必須在 API 再判斷一次,這樣才能不會讓資料造成對應不到的問題。

{
    isDisabled: function (view, rowIndex, colIndex, item, record) {
        if (record.get('EmployeeID') > 4) {
            return true;
        } else {
            return false;
        }
    },
    icon: '/Images/Icons/del.png',
    tooltip: '刪除',
    scope: this,
    handler: function (grid, rowIndex, colIndex) {
        alert();

    }
},

執行後如以下畫面