顯示具有 Windows Azure 相關筆記 標籤的文章。 顯示所有文章

2015年4月14日 星期二

使用 Windows Azure Redis 快取

有些資料需要大量運算,但是變動機會極低的時候,常會把運算結果存起來,下次直接抓出結果即可。

如果有使用Windows Azure,這邊提供一個快取方式。

參考:如何使用 Azure Redis 快取

首先建立Redis Cache Service

安裝StackExchange.Redis並加入參考

先來看一下Code:
  /// <summary>
  /// Cache Redis 連線字串,來自Web.config > AppSettings > CacheRedisConnectionString
  /// </summary>
  private static string _CacheRedisConnectionString = "{名稱}.redis.cache.windows.net,ssl=true,password={密碼}";
  /// <summary>
  /// Cache Redis 預設保留時間
  /// </summary>
  private static int _CacheRedisTimeOut = 60;
  /// <summary>
  /// Cache Redis 連線(類似SQLConnection)
  /// </summary>
  private static ConnectionMultiplexer CacheRedisConnection;
  /// <summary>
  /// Cache Redis 存取(類似entity framework的DbContext)
  /// </summary>
  public static IDatabase CacheRedis;

  /// <summary>
  /// 設定快取初始連線
  /// </summary>
  public static void Initialize()
  {
      if(CacheRedisConnection == null)
      {
    CacheRedisConnection = ConnectionMultiplexer.Connect(_CacheRedisConnectionString);
    if(CacheRedis == null)
    {
        CacheRedis = CacheRedisConnection.GetDatabase();
    }
      }
  }

  /// <summary>
  /// 序列化物件
  /// </summary>
  /// <param name="value"></param>
  /// <returns></returns>
  private static string Serialize(object value)
  {
      if (value == null)
    return null;
      return JsonConvert.SerializeObject(value);
  }

  /// <summary>
  /// 字串反序列化為物件
  /// </summary>
  /// <typeparam name="T">回傳物件型別</typeparam>
  /// <param name="value">字串資料</param>
  /// <returns>物件</returns>
  private static T Deserialize<T>(string value)
  {
      if (string.IsNullOrWhiteSpace(value)) return default(T);
      return JsonConvert.DeserializeObject<T>(value);
  }

  /// <summary>
  /// 取得指定型別快取物件
  /// </summary>
  /// <typeparam name="T">回傳物件型別</typeparam>
  /// <param name="key">快取名稱</param>
  /// <returns>回傳快取資料</returns>
  public static T GetCache<T>(string key)
  {
      string value = GetCache(string key);
      if(string.IsNullOrWhiteSpace(value) == true) return null;
      return Deserialize<T>(GetCache(string key));
  }

  /// <summary>
  /// 取得快取物件
  /// </summary>
  /// <param name="key">快取名稱</param>
  /// <returns>回傳快取資料</returns>
  public static string GetCache(string key)
  {
      //cache為null 或 key為空 或 Cache無資料,回傳null
      if (CacheRedis == null || string.IsNullOrWhiteSpace(key) == true || CacheRedis.KeyExists(key) == false) return null;
      return CacheRedis.StringGet(key);
  }

  /// <summary>
  /// 設定快取物件,(選用)設定系統預設快取保留時間
  /// </summary>
  /// <param name="key">快取名稱</param>
  /// <param name="value">要快取的資料</param>
  /// <param name="defaultexpiry">是否設定預設快取保留時間</param>
  public static void SetCache(string key, object value, bool defaultexpiry = true)
  {
      SetCache(key, value, 0, defaultexpiry);
  }

  /// <summary>
  /// 設定快取物件,並設定快取保留時間
  /// </summary>
  /// <param name="key">快取名稱</param>
  /// <param name="value">要快取的資料</param>
  /// <param name="expiry">快取保留時間(分鐘)</param>
  public static void SetCache(string key, object value, int expiry)
  {
      if (expiry <= 0) throw new Exception("CacheRedisHelpers.SetCache(string key, object value, int expiry) error : No Set Expiry");
      SetCache(key, value, expiry, false);
  }

  /// <summary>
  /// (private)設定快取物件
  /// </summary>
  /// <param name="key">快取名稱</param>
  /// <param name="value">要快取的資料</param>
  /// <param name="expiry">快取保留時間(分鐘)</param>
  /// <param name="defaultexpiry">是否設定預設快取保留時間</param>
  private static void SetCache(string key, object value, int expiry, bool defaultexpiry)
  {
      //CacheRedis為null 或 key為空,則不處理
      if (CacheRedis != null && string.IsNullOrWhiteSpace(key) == false)
      {
    //value不為null,則設定快取,反之刪除
    if (value != null)
    {
        //物件轉字串
        string strvalue = value as string ?? Serialize(value);
        
        //存入Cache
        if (defaultexpiry) //使用預設快取保留時間
      CacheRedis.StringSet(key, strvalue , TimeSpan.FromMinutes(_CacheRedisTimeOut));
        else if (expiry > 0) //使用傳入快取保留時間
      CacheRedis.StringSet(key, strvalue , TimeSpan.FromMinutes(expiry));
        else //不設定快取保留時間
      CacheRedis.StringSet(key, strvalue );
    }
    else CacheRedis.KeyDelete(key);
      }
  }

在程式中,寫好建立連線的Method(Initialize),
建立共用序列化與反序列化Method,
取得的部分,如果取不到資料,Redis Cache也是回傳null,Method只是添加一些判斷減少跟Service連線,
儲存的部分,建立2種較彈性的設定保留時間Method,一個是使用預先設定的預設快取保留時間,另一個是自行設定快取保留時間,
完成了Redis Cache存取功能,接下來使用方式如下:
  //建立連線
  Initialize();
  
  //儲存資料(預設保留時間)
  SetCache("key", objvalue, true);

  //儲存資料(自訂保留時間)
  SetCache("key", objvalue, iexpiry);

  //取得資料(String)
  GetCache("key");

  //取得資料(指定Type)
  GetCache("key");

另外,在CacheRedisConnection.GetDatabase(),可以指定不同的DB(int)儲存資料(預設為0),可以將資料區分讓開發者依不同情境區分資料存放位置。

2014年4月29日 星期二

Windows Azure 遠端桌面設定+遠端掛載本機磁碟

相信大家都遇過本機(或測試Server)Run的程式一切正常(完美),但是一上到正式(或其他)Server就一堆問題,絕大多數是因為有些東西沒有設定好(這邊指的是Server上的一些設定)

最近使用Windows Azure建立雲端服務(Cloud Service),為了限制IP使用,在Web.config設定允許IP列表,本機、同事的電腦...等等測試一切正常,但是一上到Azure就完全無效

因為也是最近才接觸Azure,只用過入口網站跟VS進行設定跟上傳,一直有個疑惑,微軟不可能鎖死Server設定(一定被罵翻),因為太多狀況了,也不可能全部開放,但是遠端桌面及一些Server設定應該是可以才對,花了一些時間終於找到了方法

首先要先設定連線的帳號密碼


然後會開出設定遠端桌面,這時候敲入使用者名稱、密碼、到期日

接著將Azure設定好的遠端連線(rdp)檔下載下來

帳號已經幫你預設好了,敲入密碼就可以連線進去了


參考:
微軟Azure測試心得分享(四) :啟用Virtual Machine (中)
遠端連線至 Windows Azure 雲端服務


補充:
透過VS去上傳專案,真的是有夠慢的,只更新DLL也要傳個老半天,雲端服務又不支援FTP,也不想安裝(或自己開發)檔案傳輸工具,透過David Kuo的協助,原來可以透過遠端桌面掛載本機磁碟的方式達到網路硬碟的功效

利用Azure下載的遠端桌面檔,設定要分享的本機磁碟

進入後就可以在檔案總管看到我們分享進來的本機磁碟

這樣傳檔案就真的方便多了

參考:
遠端桌面本機與遠端檔案互傳 (MS AZURE 適用)

2014年1月15日 星期三

Azure Storage Explorer 輕鬆管理 Windows Azure 儲存體

Azure Storage Explorer 是一個可以輕鬆管理 Windows Azure 儲存體的工具,省去在一般管理時切換不同的 Blob、Table、Queue 甚至是不同的儲存體操作的時間,如果是私密的 Blob,可以很快的取得 Blob 在 SAS ( shared access signature ) 後的網址。初次使用,只需要做一次設定,往後即可方便且快速使用。

以下就說明 Azure Storage Explorer 安裝設定與基本操作。

1.

首先到 Azure Storage Explorer 官方網站 下載 Azure Storage Explorer 到本機硬碟。


2.

利用「傻瓜安裝法」將 Azure Storage Explorer 安裝到電腦。

3.

執行 Azure Storage Explorer 後會如同下圖狀態


4.

接下來就要做初始設定了,在 Azure Storage Explorer 點擊 Add Account 會跳出要輸入 Storage account name 和 Storage account key,此時要至 Windows Azure 選擇儲存體且取得儲存體的名稱與金鑰。如下圖所示設定:


5.

設定完成後,即可針對該儲存體的內容做新增或是調整,右側上方可以選擇該儲存體的 Blob、Table 或 Queue,而左上方可以新增、複製、更名、刪除 實體,而右邊中間區塊就是實體內的物件列表,若是 Blob 裡面就是檔案列表。雙擊某個檔案就會顯示該檔案資訊。


6.

由於 Table、Queue 操作較單純,功能很雷同,這裡就讓各位使用者去嘗試,在此針對 Blob 說明較獨特的功能做說明。

除了基本功能:檢視、複製、更名、刪除、上傳、下載,另外還有一個權限功能:

Blob 針對容器有三種權限設定,Private、Public Blob、Public Container,其中 Public Container 是只要知道這個檔案網址的人都可以對此檔案做動作,其他都必須要取得含有所謂的共享存取簽章( Shared Access Signature ) 的網址,以便讓系統知道這個網址是有權限讀取的。網址後面會帶取得這圖片的 token,而這 token 經過解密後,就可以得知使用者對這張照片所有的權限。

所以依照下圖所示,即可取得檔案含有共享存取簽章( Shared Access Signature ) 的網址。當然,你可以在這上面設定這張圖片的新增、寫入、刪除、列表功能,甚至是存取的時間。


Azure Storage Explorer 是一個很好用的工具,幾個鍵就等於在網頁上做很多動作,這可能要使用過後才會有這樣的感覺。


2013年10月27日 星期日

ASP.NET MVC 4 中將資料寫入 Windows Azure Table Storage

繼前一篇 ASP.NET MVC 4 WebApi 中使用 ActionFilter 紀錄 Log 提到如何擷取出使用者使用 Action 的狀況,接下來就是將這些狀況紀錄到 Windows Azure Table Storage (儲存體) 內。

1.

首先,先將 Table Storage 的連接字串 (Connection String) 記下來,可以先到 Windows Azure 內找到這個資訊,請照下圖方式找到:

將這組組好的連接字串,放到 ASP.NET MVC 4 專案中的 Windows Azure Web Role 的組態檔內,多設置一組連結字串,照以下圖片設置:

2.

此時你就可以開始寫程式了,可以先將建立 Table Storage 連接:
CloudStorageAccount storageAccount = CloudStorageAccount.Parse(
    CloudConfigurationManager.GetSetting("StorageConnectionString"));

// 建立連接
CloudTableClient tableClient = storageAccount.CreateCloudTableClient();

在 Azure Table 內,每筆資料需要兩個主要的 Key,PartitionKey 和 RowKey,這兩個 Key 值可以組成唯一值。其實要看這兩筆 Key 很簡單,把 PartitionKey 看成是資料表名稱、 RowKey 就看成是主鍵,因為這兩組 Key 如果在 SQL Server 當然很好分辨,但是資料全部轉為 Table 格式,就只能這樣子去看待。

所以要先設定 PartitionKey 名稱,並且建立此表。
private const string LogTableName = "Logs";

...

// 假設表不存在則建立。
tableClient.CreateTableIfNotExist(LogTableName);

// 取得 Table 
TableServiceContext serviceContext = tableClient.GetDataServiceContext();

3.

接著設置一組類別,當作是 Table 的所有欄位,要繼承 TableServiceEntity,必須引用參考 Microsoft.WindowsAzure.StorageClient:
using System;
using System.Collections.Generic;
using System.Linq;
using System.Web;

using System.ComponentModel;
using System.ComponentModel.DataAnnotations;
using System.ComponentModel.DataAnnotations.Schema;
using System.Runtime.Serialization;

using Microsoft.WindowsAzure.StorageClient;

namespace EnterprisePortal.Models
{
    [NotMapped]
    public class Log : TableServiceEntity
    {
        public Log(string partitionKey, string rowKey)
            : base(partitionKey, rowKey)
        {

        }

        public Log() : this("Logs", Guid.NewGuid().ToString())
        {
        }

        public string Location { get; set; }

        public string ServerIP { get; set; }

        public string PublicIP { get; set; }

        public string ErrorMessage { get; set; }

        public Guid Creater { get; set; }

    }
}

4.

可以開始使用這個類別對 Azure Table 做 CRUD 的動作了。
Log _log = new Log();

if (context.Exception == null)
{
    _log.Creater = Guid.NewGuid();
    _log.ErrorMessage = string.Empty;
    _log.Location = context.ActionContext.Request.RequestUri + " | " + context.ActionContext.Request.Method;
    _log.PublicIP = GetPublicIP();
    _log.ServerIP = GetServerIP();
}
else
{
    _log.Creater = Guid.NewGuid();
    _log.ErrorMessage = context.Exception.Message;
    _log.Location = context.Exception.TargetSite.DeclaringType.ToString() + " | " + context.Exception.TargetSite.Name;
    _log.PublicIP = GetPublicIP();
    _log.ServerIP = GetServerIP();
}

/* 刪除 */
List<Log> lstLogs =
(from e in serviceContext.CreateQuery<Log>(LogTableName)
 where e.PartitionKey == "Logs"
 select e).ToList();

foreach (var t_Log in lstLogs)
    serviceContext.DeleteObject(t_Log);

serviceContext.SaveChangesWithRetries();

/* 新增 */

serviceContext.AddObject(LogTableName, _log);

serviceContext.SaveChangesWithRetries();

/* 查詢 */
CloudTableQuery<Log> partitionQuery =
(from e in serviceContext.CreateQuery<Log>(LogTableName)
 where e.PartitionKey == "Logs"
 select e).AsTableServiceQuery<Log>();

 
foreach (Log entity in partitionQuery)
{
    Console.WriteLine("{0}, {1}\t{2}\t{3}", entity.PartitionKey, entity.RowKey,
        entity.PublicIP, entity.ErrorMessage);
}


2013年10月19日 星期六

將網站部署到 Windows Azure

繼前一篇 如何將 SQL Server 資料庫部署到 SQL Azure,今天就來介紹將網站部署到 Windows Azure。

1.

至 Windows Azure 選擇網站,並決定要部屬的網站名稱。

2.

下載發行設定檔 ( 副檔名為 PublishSettings )

必須妥善保管此檔案

3.

選擇網站要使用的 SQL Azure,並且取得它的連接 字串,其中密碼是不顯示在上面的, 必須修改密碼部分才是完整的 連接字串

4.

針對要上傳的專案點擊「發行」

5.

設置發行設定檔,若在伺服器總管中有設定 Windows Azure 網站, 亦可直接設置。


6.

選定好發行設定檔或者 Windows Azure 網站,按下一個就會帶出網站的設定資訊。可按下驗證連線確定無誤。

7.

接下來要設定資料連接字串,再來就需要複製第 3 步驟的資料庫字串置換密碼後貼到這裡。

8.

最後確認上傳檔案。按下發行。

9.

發行完就可以確認網站是否運行。打完收工


2013年10月18日 星期五

如何將 SQL Server 資料庫部署到 SQL Azure

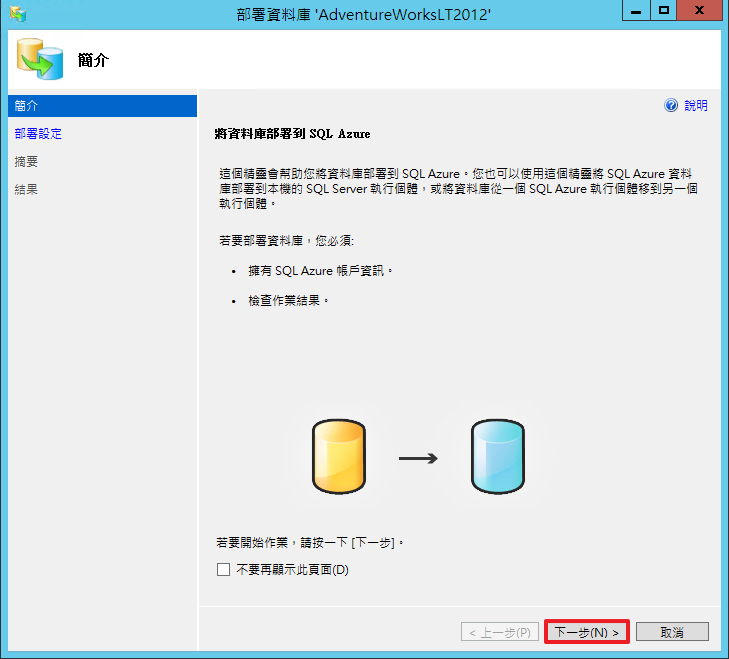
最近小弟因工作需求必須要使用 Windows Azure 上的功能,今天就來介紹將 SQL Server 資料庫部署到 SQL Azure 的步驟。

1.

在 SQL Server 選定要同步的資料庫,點選右鍵 > 工作 > 將資料庫部署到 SQL Azure

2.

下一步

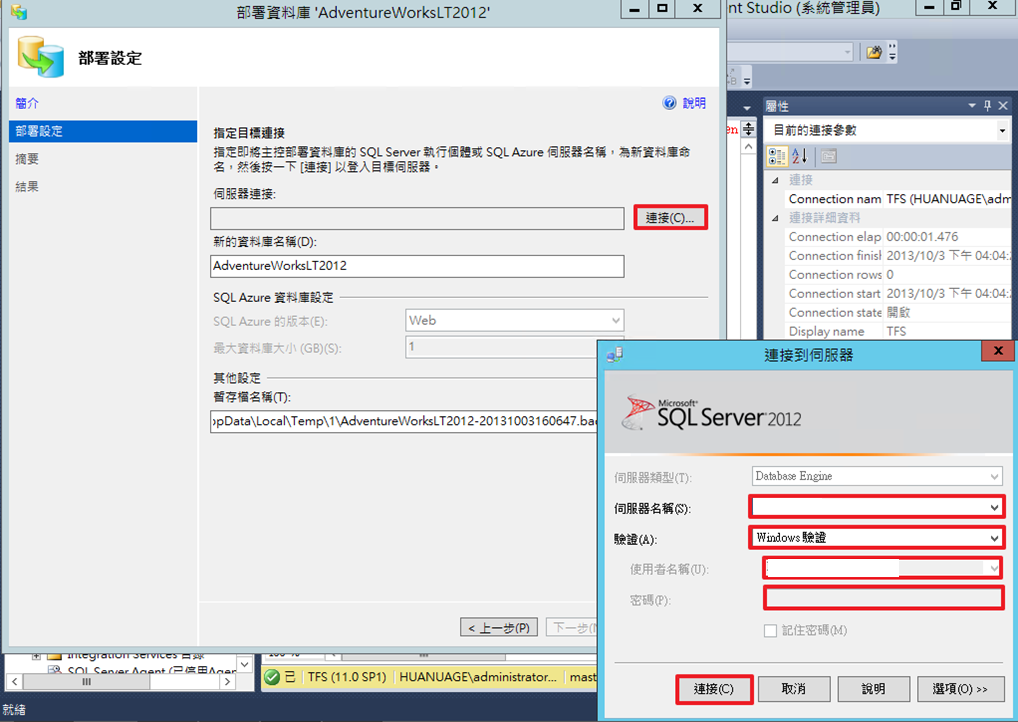
3.

此步驟要連接資料庫,可設定網域內的 SQL Server 或者是 SQL Azure 的,在此連接字串可從 Windows Azure 取得在 Key-in 到連接資訊中。( 機密資訊已處理 )


4.

確認部署詳細資料

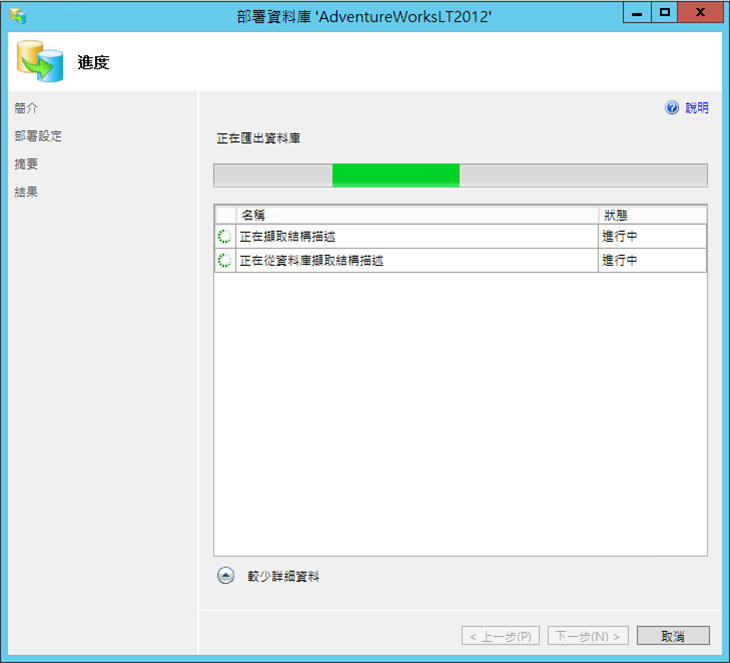
5.

部署中...

6.

請注意,每個資料表必須要有叢集索引 ( Clustering Index ),要不然只要一個資料表失敗就會整個 Rollback。

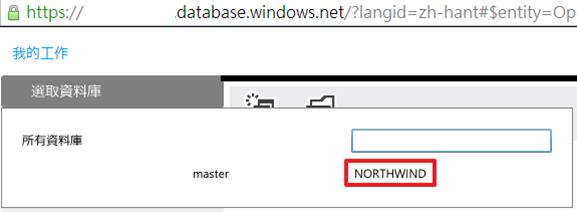
7.

最後,雲端上就會多出剛剛部署完的資料庫。

8.

打完收工