2015年5月7日 星期四

Async/Await、Task產生執行緒

之前一直認為,Async/Await跟Task一樣都會建出新的執行緒,這是錯誤的,Await是用主執行緒,遇到真正的Async方法(ex:HttpClient.GetAsync)或手動執行的Task.Run或Task.Factory.StartNew,這樣才會建立出新的執行緒

//主執行緒ID
Console.WriteLine(string.Format("Main:{0}", System.Threading.Thread.CurrentThread.ManagedThreadId));

//Task執行緒ID
Task t = Task.Run(() => { Console.WriteLine(string.Format("Task:{0}", System.Threading.Thread.CurrentThread.ManagedThreadId)); });

//使用Await呼叫方法
await GetAwaitThreadId();

//等候Task完成
t.Wait();

async Task GetAwaitThreadId()
{
  //Await方法執行緒ID
  Console.WriteLine(string.Format("Await:{0}", System.Threading.Thread.CurrentThread.ManagedThreadId));
}


另外,當呼叫非同步方法時,在前半部的程式碼(Await之前),依然是原本的執行緒在執行,遇到Await時,原本的執行緒會回到呼叫端
後半部的程式碼(Await之後),會暫時被保留,等到要等待的工作完成以後,會另外找一條執行緒出來執行後半部程式碼
//呼叫方法
Task t = PrintAwaitThreadId();
for (int i = 0; i < 10; i++)
{
  //列出目前執行緒
  Console.WriteLine(string.Format("Main[{1}]:{0}", System.Threading.Thread.CurrentThread.ManagedThreadId, i));
  //產生新的執行緒做時間延遲
  await Task.Delay(rnd.Next(1, 10));
}
await t;

async Task PrintAwaitThreadId()
{
  for (int i = 0; i < 10; i++)
  {
    //列出目前執行緒
    Console.WriteLine(string.Format("Await[{1}]:{0}", System.Threading.Thread.CurrentThread.ManagedThreadId, i));
    //產生新的執行緒做時間延遲
    await Task.Delay(rnd.Next(1, 10));
  }
}


2015年4月14日 星期二

使用 Windows Azure Redis 快取

有些資料需要大量運算,但是變動機會極低的時候,常會把運算結果存起來,下次直接抓出結果即可。

如果有使用Windows Azure,這邊提供一個快取方式。

參考:如何使用 Azure Redis 快取

首先建立Redis Cache Service

安裝StackExchange.Redis並加入參考

先來看一下Code:
  /// <summary>
  /// Cache Redis 連線字串,來自Web.config > AppSettings > CacheRedisConnectionString
  /// </summary>
  private static string _CacheRedisConnectionString = "{名稱}.redis.cache.windows.net,ssl=true,password={密碼}";
  /// <summary>
  /// Cache Redis 預設保留時間
  /// </summary>
  private static int _CacheRedisTimeOut = 60;
  /// <summary>
  /// Cache Redis 連線(類似SQLConnection)
  /// </summary>
  private static ConnectionMultiplexer CacheRedisConnection;
  /// <summary>
  /// Cache Redis 存取(類似entity framework的DbContext)
  /// </summary>
  public static IDatabase CacheRedis;

  /// <summary>
  /// 設定快取初始連線
  /// </summary>
  public static void Initialize()
  {
      if(CacheRedisConnection == null)
      {
    CacheRedisConnection = ConnectionMultiplexer.Connect(_CacheRedisConnectionString);
    if(CacheRedis == null)
    {
        CacheRedis = CacheRedisConnection.GetDatabase();
    }
      }
  }

  /// <summary>
  /// 序列化物件
  /// </summary>
  /// <param name="value"></param>
  /// <returns></returns>
  private static string Serialize(object value)
  {
      if (value == null)
    return null;
      return JsonConvert.SerializeObject(value);
  }

  /// <summary>
  /// 字串反序列化為物件
  /// </summary>
  /// <typeparam name="T">回傳物件型別</typeparam>
  /// <param name="value">字串資料</param>
  /// <returns>物件</returns>
  private static T Deserialize<T>(string value)
  {
      if (string.IsNullOrWhiteSpace(value)) return default(T);
      return JsonConvert.DeserializeObject<T>(value);
  }

  /// <summary>
  /// 取得指定型別快取物件
  /// </summary>
  /// <typeparam name="T">回傳物件型別</typeparam>
  /// <param name="key">快取名稱</param>
  /// <returns>回傳快取資料</returns>
  public static T GetCache<T>(string key)
  {
      string value = GetCache(string key);
      if(string.IsNullOrWhiteSpace(value) == true) return null;
      return Deserialize<T>(GetCache(string key));
  }

  /// <summary>
  /// 取得快取物件
  /// </summary>
  /// <param name="key">快取名稱</param>
  /// <returns>回傳快取資料</returns>
  public static string GetCache(string key)
  {
      //cache為null 或 key為空 或 Cache無資料,回傳null
      if (CacheRedis == null || string.IsNullOrWhiteSpace(key) == true || CacheRedis.KeyExists(key) == false) return null;
      return CacheRedis.StringGet(key);
  }

  /// <summary>
  /// 設定快取物件,(選用)設定系統預設快取保留時間
  /// </summary>
  /// <param name="key">快取名稱</param>
  /// <param name="value">要快取的資料</param>
  /// <param name="defaultexpiry">是否設定預設快取保留時間</param>
  public static void SetCache(string key, object value, bool defaultexpiry = true)
  {
      SetCache(key, value, 0, defaultexpiry);
  }

  /// <summary>
  /// 設定快取物件,並設定快取保留時間
  /// </summary>
  /// <param name="key">快取名稱</param>
  /// <param name="value">要快取的資料</param>
  /// <param name="expiry">快取保留時間(分鐘)</param>
  public static void SetCache(string key, object value, int expiry)
  {
      if (expiry <= 0) throw new Exception("CacheRedisHelpers.SetCache(string key, object value, int expiry) error : No Set Expiry");
      SetCache(key, value, expiry, false);
  }

  /// <summary>
  /// (private)設定快取物件
  /// </summary>
  /// <param name="key">快取名稱</param>
  /// <param name="value">要快取的資料</param>
  /// <param name="expiry">快取保留時間(分鐘)</param>
  /// <param name="defaultexpiry">是否設定預設快取保留時間</param>
  private static void SetCache(string key, object value, int expiry, bool defaultexpiry)
  {
      //CacheRedis為null 或 key為空,則不處理
      if (CacheRedis != null && string.IsNullOrWhiteSpace(key) == false)
      {
    //value不為null,則設定快取,反之刪除
    if (value != null)
    {
        //物件轉字串
        string strvalue = value as string ?? Serialize(value);
        
        //存入Cache
        if (defaultexpiry) //使用預設快取保留時間
      CacheRedis.StringSet(key, strvalue , TimeSpan.FromMinutes(_CacheRedisTimeOut));
        else if (expiry > 0) //使用傳入快取保留時間
      CacheRedis.StringSet(key, strvalue , TimeSpan.FromMinutes(expiry));
        else //不設定快取保留時間
      CacheRedis.StringSet(key, strvalue );
    }
    else CacheRedis.KeyDelete(key);
      }
  }

在程式中,寫好建立連線的Method(Initialize),
建立共用序列化與反序列化Method,
取得的部分,如果取不到資料,Redis Cache也是回傳null,Method只是添加一些判斷減少跟Service連線,
儲存的部分,建立2種較彈性的設定保留時間Method,一個是使用預先設定的預設快取保留時間,另一個是自行設定快取保留時間,
完成了Redis Cache存取功能,接下來使用方式如下:
  //建立連線
  Initialize();
  
  //儲存資料(預設保留時間)
  SetCache("key", objvalue, true);

  //儲存資料(自訂保留時間)
  SetCache("key", objvalue, iexpiry);

  //取得資料(String)
  GetCache("key");

  //取得資料(指定Type)
  GetCache("key");

另外,在CacheRedisConnection.GetDatabase(),可以指定不同的DB(int)儲存資料(預設為0),可以將資料區分讓開發者依不同情境區分資料存放位置。

2015年1月20日 星期二

Entity Framework Code First依屬性(Attribute)設定SQL欄位 (續)

花了點時間把Entity Framework Code First依屬性(Attribute)設定SQL欄位的程式碼Review過一次,總覺得設定的地方怪怪的,GetMethods()以後,指定第幾個到底是為了什麼?

if (propAttr.prop.PropertyType.IsGenericType && propAttr.prop.PropertyType.GetGenericTypeDefinition() == typeof(Nullable<>))
{
  methodInfo = entityConfig.GetType().GetMethods().Where(p => p.Name == "Property").ToList()[7];
}
else
{
  methodInfo = entityConfig.GetType().GetMethods().Where(p => p.Name == "Property").ToList()[6];
}
decimalConfig = methodInfo.Invoke(entityConfig, new[] { lambdaExpression }) as DecimalPropertyConfiguration;
decimalConfig.HasPrecision((byte)propAttr.attr.Precision, (byte)propAttr.attr.Scale);

從Debug模式下去看,原來Property有很多,需要指定正確的Type,不然就會發生轉換失敗的錯誤,而部分資料類別又有區分允不允許NULL,所以造就了上面詭異的CODE
判斷有沒有允許NULL後,強制指定對應的資料型別,這個方法在網路上廣為流傳,但這實在是太暴力了,如果哪一天順序被改掉,會有一堆人死在那邊
為了避免這種情況發生,決定嘗試去判斷對應型別有沒有允許NULL,無奈小弟功力不夠深厚,一直找不出解決方法

運氣還不錯的找到了一組原始碼HerrKater/EntityHelper.cs
參考了裡面的ProcessDecimalProperties,在GetMethod取得MethodInfo時,後面傳入的Type[]使用LambdaExpression.GetType()去指定對應型別,這時候就可以找到我們正確的DecimalPropertyConfiguration
MethodInfo methodInfo = entityConfig.GetType().GetMethod("Property", new[] { lambdaExpression.GetType() });
DecimalPropertyConfiguration decimalConfig = methodInfo.Invoke(entityConfig, new[] { lambdaExpression }) as DecimalPropertyConfiguration;
decimalConfig.HasPrecision((byte)propAttr.attr.Precision, (byte)propAttr.attr.Scale);


另外參考了他取得在DbContext內宣告DbSet<>的方法
var contextProperties = typeof (T).GetProperties().Where(p => p.PropertyType.IsGenericType && p.PropertyType.GetGenericTypeDefinition() == typeof (DbSet<>));

決定把原本用命名空間做判斷的方式改掉,但是他是用PropertyInfo,然後在迴圈裡面進行轉換,這樣會變更到原本我們的Code,所以做一些調整
var tmplist = typeof(T).GetProperties().Where(p => p.PropertyType.IsGenericType && p.PropertyType.GetGenericTypeDefinition() == typeof(DbSet<>)).SelectMany(p => p.PropertyType.GetGenericArguments()).Where(t => t.GetProperties(BindingFlags.Public | BindingFlags.Instance).Any(p => p.GetCustomAttribute<DecimalAttribute>() != null));

備註:
取得PropertyInfo以後,要先取PropertyType找出宣告的Type,但是因為有外層的DbSet<>,所以還需要再使用GetGenericArguments()去找出定義的Model

參考:
Entity Framework Code First建立Decimal,並設定大小
Entity Framework Code First依屬性(Attribute)設定SQL欄位
HerrKater/EntityHelper.cs

2015年1月19日 星期一

Entity Framework Code First依屬性(Attribute)設定SQL欄位

繼上遍Entity Framework Code First建立Decimal,並設定大小,覺得要針對每個Model設定SQL欄位大小,又要設定驗證大小,日後維護要改2個地方,有點給他麻煩,甚至容易忘記

嘗試對已有設定DecimalAttribute的Model在OnModelCreating的時候,把所有的都一次設定完

首先建立一個靜態類別DecimalModelCreating,並建立設定方法OnModelCreating(如下)


public static class DecimalModelCreating
{
  public static void OnModelCreating(DbModelBuilder modelBuilder, string Namespace)
  {
    //取得所有在指定命名空間中,有欄位包含DecimalAttribute的類別
    foreach (Type classType in from t in Assembly.GetAssembly(typeof(DecimalAttribute)).GetTypes() where t.IsClass == true && string.IsNullOrEmpty(t.Namespace) == false && t.Namespace.Equals(Namespace, StringComparison.CurrentCultureIgnoreCase) == true && t.GetProperties(BindingFlags.Public | BindingFlags.Instance).Any(p => p.GetCustomAttribute<DecimalAttribute>() != null) select t)
    {
      //取得類別中,包含DecimalAttribute的欄位
      foreach (var propAttr in classType.GetProperties(BindingFlags.Public | BindingFlags.Instance).Where(p => p.GetCustomAttribute<DecimalAttribute>() != null).Select(p => new { prop = p, attr = p.GetCustomAttribute<DecimalAttribute>(true) }))
      {
        var entityConfig = modelBuilder.GetType().GetMethod("Entity").MakeGenericMethod(classType).Invoke(modelBuilder, null);
        ParameterExpression param = ParameterExpression.Parameter(classType, "c");
        Expression property = Expression.Property(param, propAttr.prop.Name);
        LambdaExpression lambdaExpression = Expression.Lambda(property, true, new ParameterExpression[] { param });
        DecimalPropertyConfiguration decimalConfig;
        MethodInfo methodInfo;
        //依欄位是否允許null,設定對應MethodInfo
        if (propAttr.prop.PropertyType.IsGenericType && propAttr.prop.PropertyType.GetGenericTypeDefinition() == typeof(Nullable<>))
        {
          methodInfo = entityConfig.GetType().GetMethods().Where(p => p.Name == "Property").ToList()[7];
        }
        else
        {
          methodInfo = entityConfig.GetType().GetMethods().Where(p => p.Name == "Property").ToList()[6];
        }
        decimalConfig = methodInfo.Invoke(entityConfig, new[] { lambdaExpression }) as DecimalPropertyConfiguration;
        decimalConfig.HasPrecision((byte)propAttr.attr.Precision, (byte)propAttr.attr.Scale);
      }
    }
  }
}

接著將DbContextOnModelCreating調整為使用DecimalModelCreating進行設定
protected override void OnModelCreating(DbModelBuilder modelBuilder)
{
  DecimalModelCreating.OnModelCreating(modelBuilder, "YourNamespance");
  base.OnModelCreating(modelBuilder);
}

參考:
Entity Framework Code First建立Decimal,並設定大小

2015/01/19調整:
近期將部分資料表移到Azure Storage Table的時候,發生了資料庫移轉錯誤
在模型產生期間偵測到一個或多個驗證錯誤:
System.Data.Entity.Edm.EdmEntityType: : EntityType 'myclass' 未定義索引鍵。請定義此 EntityType 的索引鍵。
System.Data.Entity.Edm.EdmEntitySet: EntityType: EntitySet 'myclass' 是以未定義索引鍵的類型 'myclass' 為基礎。

檢查OnModelCreating後發現,在條件中,只要是在指定命名空間(Namespace)的Model都會被設定:
t.Namespace.Equals(Namespace, StringComparison.CurrentCultureIgnoreCase) == true

增加判斷語法,除了命名空間以外,還要有宣告在DbContext裡面:
typeof(MyContext).GetProperties().Where(x => x.PropertyType.IsGenericType && x.PropertyType.Name.StartsWith("DbSet") && x.PropertyType.GenericTypeArguments != null && x.PropertyType.GenericTypeArguments.Count() > 0).SelectMany(x => x.PropertyType.GenericTypeArguments).Select(x => x.Name).Contains(t.Name)

參考:
Entity Framework Code First建立Decimal,並設定大小
延伸閱讀:
Entity Framework Code First依屬性(Attribute)設定SQL欄位 (續)

Entity Framework Code First建立Decimal,並設定大小

在Sql建立Decimal的時候,習慣性會設定大小,但是在使用Entity Framework Code First的時候卻發現2個問題:
1.沒辦法改變大小(預設是18,2),可能欄位太大或是小數位數不夠
2.沒辦法檢查傳入的資料有沒有在限制的範圍內,可能會發生輸入不符合規則

有人會使用float或double,然後配合[RangeAttribute]去限制大小,以及[RegularExpressionAttribute]來檢驗格式;這或許解決了資料驗證的問題,但是總不可能每個欄位都去下這些屬性,對資料庫欄位大小問題也一樣沒有解決。
首先先來解決資料庫decimal大小問題。
網路上找的最快的方式(Set decimal(16, 3) for a column in Code First Approach in EF4.3)
public class MyContext : DbContext
{
  public DbSet<myclass> MyClass;
  protected override void OnModelCreating(DbModelBuilder modelBuilder)
  {
    modelBuilder.Entity<myclass>().Property(x => x.Sum).HasPrecision(5, 1);
    modelBuilder.Entity<myclass>().Property(x => x.Price).HasPrecision(3, 1);
    base.OnModelCreating(modelBuilder);
  }
}
解決了資料庫大小問題


測試下去就會發現,輸入多少都可以過,只是到資料庫會被截掉,要再加個驗證讓ModelState.IsValid可以為我們擋掉。
先建立一個DecimalAttribute繼承ValidationAttribute
[AttributeUsage(AttributeTargets.Property | AttributeTargets.Field | AttributeTargets.Parameter, AllowMultiple = false)]
public class DecimalAttribute : ValidationAttribute
{
  public int Precision = 18;
  public int Scale = 2;
  public DecimalAttribute(int Precision = 18, int Scale = 2)
  {
    this.Precision = Precision;
    this.Scale = Scale;
  }
  public override bool IsValid(object value)
  {
    if (value == null)
    {
      return true;
    }
    try
    {
      decimal valueAsDecimal = Convert.ToDecimal(value);
      SqlDecimal sqlDecimal = SqlDecimal.ConvertToPrecScale(new SqlDecimal(valueAsDecimal), Precision, Scale);
    }
    catch (Exception ex)
    {
      if (string.IsNullOrEmpty(base.ErrorMessage) == true)
      {
        base.ErrorMessage = ex.Message;
      }
      return false;
    }
    return true;
  }
}
傳入資料測試驗證機制正常運行

延伸閱讀:
Entity Framework Code First依屬性(Attribute)設定SQL欄位
Entity Framework Code First依屬性(Attribute)設定SQL欄位 (續)

2014年12月19日 星期五

升級 Microsoft Azure Storage 4.3.0 以節省輸出流量、加快速度

使用 Microsoft Azure Storage 來擷取 Azure Table 的資料,通常要考慮速度與流量的最佳化,但原本的版本是 Microsoft Azure Storage 2.0.6,是沒有支援 OData 的,且 SDK 又是以 URL 去和 Azure Table 要資料,且一次都會要所有欄位資料,且速度也很慢,更別說還要做一些資料處理了。

我舉我的 Log 為例:

Log 資料欄位約略有 10 欄。
TableQuery query = (new TableQuery());
var data = table.ExecuteQuery(query);

var _query = (
    from entity in data
    // where entity.ErrorMessage != ""
    where entity.Timestamp > DateTime.Now.AddDays(-1)

    // where entity.Location.EndsWith("PUT")
    orderby entity.Timestamp descending
    select entity
);
DateTime std = DateTime.Now;

var r = _query.ToList();

DateTime etd = DateTime.Now;
TimeSpan diffDT = etd.Subtract(std);
Console.WriteLine("DateTime Method : {0} ms", diffDT.TotalMilliseconds);

資料有 370 筆,執行時間 25275.3736 ms,約 25 秒。

使用 Fiddler 來看:


由於 Azure Table 資料輸出有限制筆數,所以才會要那麼多次,每一份資料都 760000 bytes 左右,0.76 MB 左右。

升級 Microsoft Azure Storage 4.3.0 後,將程式碼稍微改一下,抓出需要使用的欄位就好:
TableQuery query = (new TableQuery()).Select(new string[] { "partitionKey", "Timestamp" });

資料有 330 筆,執行時間 9779.4132 ms,約 9.7 秒。

使用 Fiddler 來看:

這樣一來,既省輸出流量,也縮短時間,所以還沒有升級不訪升級試看看。


2014年11月25日 星期二

ASP.NET MVC 解決加入「控制器」( Controller ) 消失的問題

前陣子將專案升級,在 NuGet 安裝 ASP.NET Web API 2.2 for OData v4.0 套件,產生許多 dll 版本錯誤之問題。

修正後,又發現在要加入「控制項」( Controller ) 時,找不到該選項,如下圖:


甚至連加入「區域」( Areas ) 也找不到。

後來找到 visual studio 2013 'add controller' missing 文章解說,照以下方法即可解決:

1.

卸載專案

2.

編輯專案檔

3.

尋找 ProjectTypeGuids 標籤 ( 請先備分 ),將內容改為
<ProjectTypeGuids>{E3E379DF-F4C6-4180-9B81-6769533ABE47};{349c5851-65df-11da-9384-00065b846f21};{fae04ec0-301f-11d3-bf4b-00c04f79efbc}</ProjectTypeGuids>

儲存

4.

重新載入專案,完成。


2014年8月8日 星期五

ASP .NET MVC4 WebApi - 不允許路由(Route)跨區域(Area)找Controller

目前專案設定權限是採用Area進行區分,基本規劃為角色 1..n Area

最近在強化權限控管,發現在Area找不到Controller的時候,竟然會去其他的Area找有沒有符合名稱的Controller(如何切換 Area 的 Web Api 路由)

對規劃的權限區分來說,這一個非常嚴重的問題


舉個例子:
(角色=>Area)
人員管理者=>People
薪資管理者=>Salary

王小明有人員管理者這個角色,所以他可以使用People裡的所有Controller, 碰巧王小明知道了Salary的某隻Api路徑可以取得全公司員工的薪資(api/Salary/AllPeople), 就權限管理機制,王小明沒有Salary的Area權限,所以被判定為無權限(401)。

到這邊都很沒問題,一切都很美好...如果這樣就結束,還要這篇幹嘛

偏偏王小明很有求知的精神,想說只要是People就會被放行,那如果把Salary改成People不知道可不可以?
於是原本的路徑(api/Salary/AllPeople)變成了(api/People/AllPeople)。

這時候權限機制判斷王小明是人員管理者,可以訪問People的Area,所以放行讓他通過, 殊不知在People下沒有AllPeople的Controller,但對權限機制來說並不重要,有沒有是ControllerSelector的問題。

這時候AreaHttpControllerSelector出馬了,經過一連串的檢查,發現People下沒有AllPeople的Controller,沒辦法走下去,那就交給老爸(DefaultHttpControllerSelector)去處理吧。

而老爸是不管這些Area的,只要符合ControllerName就好,所以找到了Salary的AllPeople,然後就跟小弟(ApiControllerActionSelector)說,從Salary的AllPeople找符合的Action來執行吧。

接著就會發現王小明引發美麗錯誤的結果,他拿到不該拿的資料了...其實也還好


這樣是不行的,如果Route有接到area的話,就只能從指定的Area下找Controller,沒找到就丟錯誤出去,所以修改一下AreaHttpControllerSelector
...略...
        private HttpControllerDescriptor GetApiController(HttpRequestMessage request)
        {
            var controllerName = base.GetControllerName(request);

            var areaName = GetAreaName(request);
            if (string.IsNullOrEmpty(areaName))
            {
                return null;
            }

            var type = GetControllerTypeByArea(areaName, controllerName);
            if (type == null)
            {
                //原本回傳null是為了向老爸求救,今天兒子要獨當一面了
                //return null;
                throw new HttpResponseException(request.CreateErrorResponse(HttpStatusCode.NotFound,
                    string.Format("No route providing a controller name was found to match request URI \"{0}\"", new object[] { request.RequestUri })));
            }

            return new HttpControllerDescriptor(_configuration, controllerName, type);
        }


參考:
如何切換 Area 的 Web Api 路由
DefaultHttpControllerSelector.cs Source Code
ApiControllerActionSelector.cs Source Code

2014年7月11日 星期五

時區到各瀏覽器顯示時間統一處理方式

今天要討論的是,當日期時間資料送到瀏覽器時,顯示出來的結果往往讓人難以捉摸。

DateTimeDateTimeOffset轉成JSON以後的結果:
{
  "DateTimeOffset": "2014-07-11T00:00:00+08:00",
  "DateTime": "2014-07-11T00:00:00"
}
DateTimeOffset後面多了+08:00,表示這個時間是特定時區的時間,而DateTime是沒有的。

這時候丟到JavaScript的Date裡面:
  new Date(DateTimeOffset);
  new Date(DateTime);
呈現在畫面上就會變成:
Browser DateTimeOffset DateTime
Chrome Fri Jul 11 2014 00:00:00 GMT+0800 (台北標準時間) Fri Jul 11 2014 08:00:00 GMT+0800 (台北標準時間)
IE11 Fri Jul 11 2014 00:00:00 GMT+0800 (台北標準時間) Fri Jul 11 2014 00:00:00 GMT+0800 (台北標準時間)
FireFox Fri Jul 11 2014 00:00:00 GMT+0800 (台北標準時間) Fri Jul 11 2014 00:00:00 GMT+0800 (台北標準時間)
當沒有指定時區時,顯示出來的結果因各瀏覽器定義不同,而有不同的結果。

當不想要資料庫所有欄位都記時區的時候,就需要變更一下Json的DateTimeConverter

首先宣告一個UTCDateTimeConverter,並且繼承IsoDateTimeConverter ,然後在轉JSON的時候自動轉換成設定的格式

備註1:希望給瀏覽器自動轉換為Local時間,所以是轉換成UTC(國際標準時間)
備註2:避免日後Newtonsoft.Json對IsoDateTimeConverter更新,所以不重寫WriteJson,使用設定轉換格式並由IsoDateTimeConverter的WriteJson進行轉換。
/// <summary>
/// DateTime/DateTimeOffset 傳換為UTC日期格式 (Ex: 2014-07-11T12:53:00+00:00).
/// </summary>
public class UTCDateTimeConverter : IsoDateTimeConverter
{
  /// <summary>
  /// 日期轉成Json格式
  /// </summary>
  /// <param name="writer" >The JsonWriter to write to.</param>
  /// <param name="value" >The value.</param>
  /// <param name="serializer" >The calling serializer.</param>
  public override void WriteJson(JsonWriter writer, object value, JsonSerializer serializer)
  {
    //DateTimeOffset轉換時會自動加上時區,所以要先把他轉成UTC時間的DateTime
    if (value.GetType() == typeof(DateTimeOffset))
    {
      DateTimeOffset tmpDateTimeOffset = (DateTimeOffset)value;
      value = tmpDateTimeOffset.DateTime.Add(-tmpDateTimeOffset.Offset);
    }
    //設定想要轉換的格式
    base.DateTimeFormat = "yyyy-MM-ddTHH:mm:ss.FFFFFFFK+00:00";
    //使用預設的WriteJson進行轉換
    base.WriteJson(writer: writer, value: value, serializer: serializer);
  }
}
因為希望傳出去時間格式是統一的,而使用的也是WebApi,所以直接在App_Start/WebApiConfig.cs進行設定:
config.Formatters.JsonFormatter.SerializerSettings.Converters.Add(new UTCDateTimeConverter());

轉出來的Json為:
{
  "DateTimeOffset": "2014-07-10T16:00:00+00:00",
  "DateTime": "2014-07-11T00:00:00+00:00"
}
DateTimeOffset已經是被剪了8小時。

呈現在畫面上就會變成:
Browser DateTimeOffset DateTime
Chrome Fri Jul 11 2014 00:00:00 GMT+0800 (台北標準時間) Fri Jul 11 2014 08:00:00 GMT+0800 (台北標準時間)
IE11 Fri Jul 11 2014 00:00:00 GMT+0800 (台北標準時間) Fri Jul 11 2014 08:00:00 GMT+0800 (台北標準時間)
FireFox Fri Jul 11 2014 00:00:00 GMT+0800 (台北標準時間) Fri Jul 11 2014 08:00:00 GMT+0800 (台北標準時間)


瀏覽器都統一了^^

參考:
IsoDateTimeConverter Source
Add different Json.NET DateTimeConverters through the JsonFormatter's SerializerSettings
Create a JSON.NET Date to String custom Converter

2014年7月8日 星期二

ASP .NET MVC4 WebApi-CultureInfo-文化特性排序

相信很多人都發生過,本機排序正常,一上到正式主機以後,排序出來的結果卻不一樣。

其實.NET的執行緒就跟SQL Server的資料表一樣有定序問題,所以排序結果會因為設定而有所不同,基本上執行緒的定序是跟著Server預設語系的。

在變更執行緒的語系之前,先看一下CultureInfo類別

MSDN的說明是:提供有關特定文化特性 (Culture) 的資訊 (文化特性在 Unmanaged 程式碼開發中稱為「地區設定」(Locale))。 提供的資訊包括文化特性的名稱、書寫系統、使用的曆法,以及日期和排序字串的格式。

最後面那一句話,排序字串的格式

了解了這個類別的用途,接著來看一下幾個語系排序的規則。

文化特性名稱
文化特性
預設的排序名稱和識別項
替代排序名稱和識別項
zh-TW
中文 (台灣)
筆劃:0x00000404
注音符號:0x00030404
zh-CN
中文 (中華人民共和國)
發音:0x00000804
筆劃:0x00020804
ja-JP
日文 (日本)
預設:0x00000411
Unicode:0x00010411

知道各語系排序規則以後,接著我們只需要在排序前加上一個指定就搞定了。

System.Threading.Thread.CurrentThread.CurrentCulture = new System.Globalization.CultureInfo(language);

這樣是不是很簡單呢。(明明為了排序搞了很久)

參考:
CultureInfo與中文字串排序
CultureInfo 類別


2014年5月19日 星期一

執行 API Controller 遇到 「Not running in a hosted service or the Development Fabric.」 問題之解決方案

建置 API Controller 時,執行後遇到以下錯誤訊息:

Not running in a hosted service or the Development Fabric.

描述: 在執行目前 Web 要求的過程中發生未處理的例外狀況。請檢閱堆疊追蹤以取得錯誤的詳細資訊,以及在程式碼中產生的位置。

例外狀況詳細資訊: System.InvalidOperationException: Not running in a hosted service or the Development Fabric.

原始程式錯誤:

在執行目前 Web 要求期間,產生未處理的例外狀況。如需有關例外狀況來源與位置的資訊,可以使用下列的例外狀況堆疊追蹤取得。

堆疊追蹤:

[InvalidOperationException: Not running in a hosted service or the Development Fabric.]
   Microsoft.WindowsAzure.Diagnostics.DiagnosticMonitor.GetDefaultStartupInfoForCurrentRoleInstance() +173
   Microsoft.WindowsAzure.Diagnostics.DiagnosticMonitorTraceListener..ctor() +59

[ConfigurationErrorsException: 無法建立 Microsoft.WindowsAzure.Diagnostics.DiagnosticMonitorTraceListener, Microsoft.WindowsAzure.Diagnostics, Version=2.1.0.0, Culture=neutral, PublicKeyToken=31bf3856ad364e35。]
   System.Diagnostics.TraceUtils.GetRuntimeObject(String className, Type baseType, String initializeData) +6707013
   System.Diagnostics.TypedElement.BaseGetRuntimeObject() +45
   System.Diagnostics.ListenerElement.GetRuntimeObject() +83
   System.Diagnostics.ListenerElementsCollection.GetRuntimeObject() +142
   System.Diagnostics.TraceInternal.get_Listeners() +181
   System.Diagnostics.TraceInternal.TraceEvent(TraceEventType eventType, Int32 id, String format, Object[] args) +155
   System.Diagnostics.Trace.TraceInformation(String message) +14
   System.Web.Http.Tracing.SystemDiagnosticsTraceWriter.TraceMessage(TraceLevel level, String message) +157
   System.Web.Http.Tracing.SystemDiagnosticsTraceWriter.Trace(HttpRequestMessage request, String category, TraceLevel level, Action`1 traceAction) +438
   System.Web.Http.Tracing.ITraceWriterExtensions.TraceBeginEndAsync(ITraceWriter traceWriter, HttpRequestMessage request, String category, TraceLevel level, String operatorName, String operationName, Action`1 beginTrace, Func`1 execute, Action`2 endTrace, Action`1 errorTrace) +464
   System.Web.Http.Tracing.Tracers.RequestMessageHandlerTracer.SendAsync(HttpRequestMessage request, CancellationToken cancellationToken) +367
   System.Net.Http.DelegatingHandler.SendAsync(HttpRequestMessage request, CancellationToken cancellationToken) +41
   System.Web.Http.HttpServer.SendAsync(HttpRequestMessage request, CancellationToken cancellationToken) +390
   System.Net.Http.HttpMessageInvoker.SendAsync(HttpRequestMessage request, CancellationToken cancellationToken) +55
   System.Web.Http.WebHost.HttpControllerHandler.BeginProcessRequest(HttpContextBase httpContextBase, AsyncCallback callback, Object state) +316
   System.Web.Http.WebHost.HttpControllerHandler.System.Web.IHttpAsyncHandler.BeginProcessRequest(HttpContext httpContext, AsyncCallback callback, Object state) +77
   System.Web.CallHandlerExecutionStep.System.Web.HttpApplication.IExecutionStep.Execute() +301
   System.Web.HttpApplication.ExecuteStep(IExecutionStep step, Boolean& completedSynchronously) +155

這因為是 Windows Azure 雲端服務專案發生的情況,所以解決方法有二:

1.

建置 Windows Azure 雲端服務會有兩個專案,一為 ASP.NET MVC 4 Web 應用程式,另一個是 Windows Azure Web Role 專案。必須在方案內設定 Windows Azure Web Role 專案為「啟用」,像我就是設定 ASP.NET MVC 4 Web 應用程式 為「啟用」。

2.

web.config 中移除追蹤接聽項 ( trace listener ):
<trace>
  <listeners>
    <add type="Microsoft.WindowsAzure.Diagnostics.DiagnosticMonitorTraceListener, Microsoft.WindowsAzure.Diagnostics, Version=2.1.0.0, Culture=neutral, PublicKeyToken=31bf3856ad364e35"
      name="AzureDiagnostics">
      <filter type="" />
    </add>
  </listeners>
</trace>  

兩種方法都能解決此種問題,我是用第二種方法解決。


2014年5月15日 星期四

Entity Framework 與 LINQ -- 篩選(Where)使用時機

最近發現,使用Entity Framework的話,要注意下Where的時機,因為有可能是會在SQL端篩選,也有可能會在C#端篩選,可能會導致不同的結果,甚至發生不支援的情況。

拿字串A是否包含了字串B作為範例,這時候在SQL端(還沒產生成實體物件)時執行結果 跟 C#端(已從DB撈出資料)執行結果 就會發生不同的狀況。
先來看一Where下在資料還沒產生成實體物件的時候
C#:
var query = db.Table.Where(x => x.Name.Contains("abc")).ToList();
SQL執行語法會是
SELECT[EmployeeId],[Name]
FROM [dbo].[Employee]
WHERE [Name] LIKE '%abc%'
由此可見,資料判斷是在SQL端處理,然後把結果丟回到C#端。

再來是Where下在ToList()後面
C#:
var query = db.Table.ToList().Where(x => x.Name.Contains("abc"));
SQL執行語法會是
SELECT[EmployeeId],[Name]
FROM [dbo].[Employee]
這時候變成了把所有Employee資料撈出來以後,在篩選資料。

一個是在SQL端下LIKE,一個是在C#端執行Contains,都是包含"abc",但是結果就會不一樣囉。

SQL的LIKE是不分辨大小寫的,所以"ABC"、"AbC"、"abc"、"abC"...都是會被認為是OK的資料。
但是在C#的Contains是有區分大小寫的,所以只有"abc"才會被篩選出來。

如果使用IndexOf去指定不區分大小寫,但是這個只能在C#端使用
錯誤的C#語法:
var query = db.Table.Where(x => x.Name.IndexOf("abc", StringComparison.CurrentCultureIgnoreCase) >= 0).ToList();
這樣會報錯,因為LINQ在轉SQL語法的時候會發生不支援的情況,就回歸到一開始提到的Where時機。
所以我們要在取出資料後,由C#去執行篩選
C#語法:
var query = db.Table.ToList().Where(x => x.Name.IndexOf("abc", StringComparison.CurrentCultureIgnoreCase) >= 0);

PS:Contains是使用IndexOf去實做出來的,所以基本上IndexOf效能會略好於Contains


2014年5月9日 星期五

ASP .NET MVC4 WebApi -- OData 使用 與 實作$inlinecount(續2) -- 中繼傳遞OData參數

延續前二篇
(ASP .NET MVC4 WebApi -- OData 使用 與 實作$inlinecount)
(ASP .NET MVC4 WebApi -- OData 使用 與 實作$inlinecount(續) -- C# Model 接取$inlinecount 資料)

範例為建立一個API,把OData參數傳給資料來源Api,然後做簡單處理或直接回傳(資料來源Api開放使用OData)。

建立一個Api
//如果有$inlinecount就會是不同的格式,所以這邊回傳Object
public Object Get()
{
    return "test";
}
取得所有OData參數
List<string> arrParams = Request.GetQueryNameValuePairs() //所有QueryString的Name、Value集合
    .Where(x => x.Key.StartsWith("$")) //只取得開頭為$
    .Select(x => string.Format("&{0}={1}", x.Key, Uri.EscapeDataString(x.Value))) //組回 &Name=Value
    .ToList();
因為範例的資料來源API本身有指定參數,所以這邊會先把 & 加上,方便後面整理所有參數,請視個人情況調整加上的時機。

判斷是否有設定$inlinecount=allpages
有的話就要用C# Model 接取$inlinecount 資料的共用Model去接資料,沒有就用一般方式即可。
if(arrParams.Select(x => x.ToLower()).Contains("&$inlinecount=allpages") == true)
Select出來轉小寫以後判斷是否包含"&$inlinecount=allpages",因為沒實際測試$filter大小寫是否有區別,所以沒有在取得QueryString的時候就轉。
由組回 Name=Value 時前面有沒有加 & 來決定這邊要不要加。

組合資料來源Api的URL
string.Format("DefauleUrl?name1=val1&name2=val2{0}", string.Join("", arrParams));
string.Join要不要加 & 一樣由前面就決定了,串出來的Url請仔細確認參數部分的格式是不是正確的。

下面是實際範例
public Object Get()
{
    List<string> arrParams = Request.GetQueryNameValuePairs().Where(x => x.Key.StartsWith("$")).Select(x => string.Format("&{0}={1}", x.Key, Uri.EscapeDataString(x.Value))).ToList();
    bool IsAllpages = false;
    string strParams = string.Join("", arrParams);
 string strUrl = string.Format("DefauleUrl?name1=val1&name2=val2{0}", string.Join("", arrParams));
    List<ModelName> Models = new List<ModelName>();
    ODataByApi<ModelName> odateModel = new ODataByApi<ModelName>();
    if (arrParams.Select(x => x.ToLower()).Contains("&$inlinecount=allpages"))
    {
        odateModel = GetData<ODataByApi<ModelName>>(strParams);
        Models = odateModel.Items.ToList();
        IsAllpages = true;
    }
    else
    {
        Models = GetData<List<ModelName>>(strParams);
    }
 //資料處理
    if (Models != null)
    {
        //To do....
    }
 //有$inlinecount=allpages,丟回ODataByAp後return
    if (IsAllpages == true)
    {
        odateModel.Items = Models;
        return odateModel;
    }
 //否則return List
    return Models;
}

參考:
(ASP .NET MVC4 WebApi -- OData 使用 與 實作$inlinecount)
(ASP .NET MVC4 WebApi -- OData 使用 與 實作$inlinecount(續) -- C# Model 接取$inlinecount 資料)


2014年5月7日 星期三

ASP .NET MVC4 WebApi -- OData 使用 與 實作$inlinecount(續) -- C# Model 接取$inlinecount 資料

延續前一篇(ASP .NET MVC4 WebApi -- OData 使用 與 實作$inlinecount)

當C#去接API來的資料,且有設定$inlinecount,資料格式會變更成:
{
  "Items": [
    {
      //資料1
    },
    {
      //資料2
    },
    {
      //資料3
    }
  ],
  "NextPageLink": null,
  "Count": 3
}
Items存放資料,NextPageLink存放下一頁網址,Count存放數量

無法使用一般Model去接資料,因此需要準備一個共用Model
public class ODataByApi<T>
{
    public ICollection<T> Items { get; set; }
    public string NextPageLink { get; set; }
    public int Count { get; set; }
}

用共用Model,並指定資料Model去接資料即可
JsonConvert.DeserializeObject<ODataByApi<ModelName>>(strJson);


參考:
(ASP .NET MVC4 WebApi -- OData 使用 與 實作$inlinecount)

2014年5月5日 星期一

ASP .NET MVC4 WebApi -- OData 使用 與 實作$inlinecount

WebApi提供各種平台取得相關資料,為了滿足各種平台不同的需求(排序、分頁、查詢等等),最直覺的方式就是指定參數給他們使用,再處理各個參數,但這樣就變成不夠彈性,不需要查詢也要傳參數的值,同時加重了前、後端開發人員的麻煩。

使用OData讓前端傳入參數,不需要寫死程式,隨心所欲的完成排序、分頁、查詢等功能。
先來看看OData常用參數:
$top傳回前幾筆資料
$skip跳過幾筆資料
$filter
  • 查詢(where)
    eq-等於、gt-大於、lt-小於、ne-不等於
  • 串連
    and、or
  • $orderby排序
    $inlinecount傳回資料、總筆數、下一頁Url
  • allpages
  • none(預設)
  • 使用方式跟一般傳參數一樣,例如:http://{domain}/api/{controller}/{action}?$top=5&$skip=10
    (更多參數說明請參考官方網站)

    在API的部分,需要設定屬性[Queryable],就可以使用OData。
    備註:
    1.許多文章都說需要使用[Queryable]搭配回傳IQuerable、AsQueryable(),經過測試後,回傳IEnumerable也是可以正常使用的。
    2.如果不想開放所有參數、或有一些限制條件,後端人員可以在[Queryable]設定相關參數以達到目的

    這樣就可以依照各種情況由前端開發人員自行決定需要傳遞那些參數,而後端開發人員只需要專心的處理資料以確保資料正確性即可。


    在測試的時候發現$inlinecount一直沒辦法使用(微軟好像不支援一些參數),這樣前端在做分頁時就不知道資料總筆數,所以我們動手實作一個屬性吧

    public class InlineCountQueryableAttribute : QueryableAttribute
        {
            private static MethodInfo _createPageResult =
                typeof(InlineCountQueryableAttribute)
                .GetMethods(BindingFlags.Static | BindingFlags.NonPublic)
                .Single(m => m.Name == "CreatePageResult");
    
            public override void OnActionExecuted(HttpActionExecutedContext actionExecutedContext)
            {
                base.OnActionExecuted(actionExecutedContext);
    
                HttpRequestMessage request = actionExecutedContext.Request;
                HttpResponseMessage response = actionExecutedContext.Response;
    
                IQueryable result;
                if (response.IsSuccessStatusCode
                    && response.TryGetContentValue<IQueryable>(out result))
                {
                    long? inlineCount = request.GetInlineCount();
                    if (inlineCount != null)
                    {
                        actionExecutedContext.Response = _createPageResult.MakeGenericMethod(result.ElementType).Invoke(
                            null, new object[] { request, request.GetInlineCount(), request.GetNextPageLink(), result }) as HttpResponseMessage;
                    }
                }
            }
    
            internal static HttpResponseMessage CreatePageResult<T>(HttpRequestMessage request, long? count, Uri nextpageLink, IEnumerable<T> results)
            {
                return request.CreateResponse(HttpStatusCode.OK, new PageResult<T>(results, nextpageLink, count));
            }
        }
    
    設定屬性由[Queryable]改為[InlineCountQueryable]即可正常使用$inlinecount參數

    參考:
    System.Web.Http.OData 命名空間
    OData官網
    關於IQueryable特性的小實驗
    Web API, OData, $inlinecount and testing


    2014/07/22 KaiYai補充:
    最近無意間發現了Bug,當程式碼出現錯誤產生Exception,Action回前端時依然會進到Attribute內執行OnActionExecuted事件,因為是Exception,所以傳進來的HttpActionExecutedContext.Response會是null,而HttpActionExecutedContext.Exception會是錯誤資訊,如果利用原本程式碼收到的錯誤訊息不會是原本實際發生錯誤的部分,而是會出現OnActionExecuted內的錯誤:
    <Error>
        <Message>發生錯誤。</Message>
        <ExceptionMessage>並未將物件參考設定為物件的執行個體。</ExceptionMessage>
        <ExceptionType>System.NullReferenceException</ExceptionType>
        <StackTrace>
            ...略...
        </StackTrace>
    </Error>
    

    但實際上的錯誤應該是
    <Error>
        <Message>發生錯誤。</Message>
        <ExceptionMessage>輸入字串格式不正確。</ExceptionMessage>
        <ExceptionType>System.FormatException</ExceptionType>
        <StackTrace>
            ...略...
        </StackTrace>
    </Error>
    

    這是因為response已經收到null值,指令沒有判斷到是否為null,就會發生會設定物件的錯誤。
    所以修正條件式加上判斷response != null
    if (response != null && response.IsSuccessStatusCode && response.TryGetContentValue<IQueryable>(out result))

    原本想要直接判斷HttpActionExecutedContext.Exception != null,但想了想,為什麼執行base.OnActionExecuted(actionExecutedContext);沒有發生錯誤呢?所以決定看一下QueryableAttribute的Code,看到下的條件以後,毅然決然的直接照辦,有錯微軟會先被罵
    public override void OnActionExecuted(HttpActionExecutedContext actionExecutedContext)
    {
        ...略...
        HttpResponseMessage response = actionExecutedContext.Response;
    
        if (response != null && response.IsSuccessStatusCode) 
        ...略...
    }


    參考:
    QueryableAttribute Source(aspnetwebstack /src/System.Web.Http.OData/QueryableAttribute.cs)

    2014年4月30日 星期三

    .Net WebSite/WebApi 限制連線IP

    開發人員最怕的就是未經授權或非正常管道使用網站/網路服務

    小弟目前專案都是透過WebApi傳遞資料,都是一關卡一關

    避免有人不小心知道使用後端服務的方法,所以後端的服務都必須限制連接IP


    首先先在Web.config(會跟IIS限制IP and DomainName同步)設定禁止所有IP連接
    <configuration>
      <system.webserver>
        <security>
          <ipsecurity allowunlisted="flase">
        </ipsecurity>
        </security>
      </system>
    </configuration>
    

    這樣就禁止了所有IP連線,接下來為了方便本機測試功能是否正常,以及允許連線的IP,所以我們要在ipSecurity裡面去設定開放條件
    <configuration>
      <system.webserver>
        <security>
          <ipsecurity allowunlisted="flase">
            <add allowed="true" ipaddress="127.0.0.1" />
            <add allowed="true" ipaddress="192.168.1.1" />
          </ipsecurity>
        </security>
      </system>
    </configuration>


    這時候基本上已經完成了9成

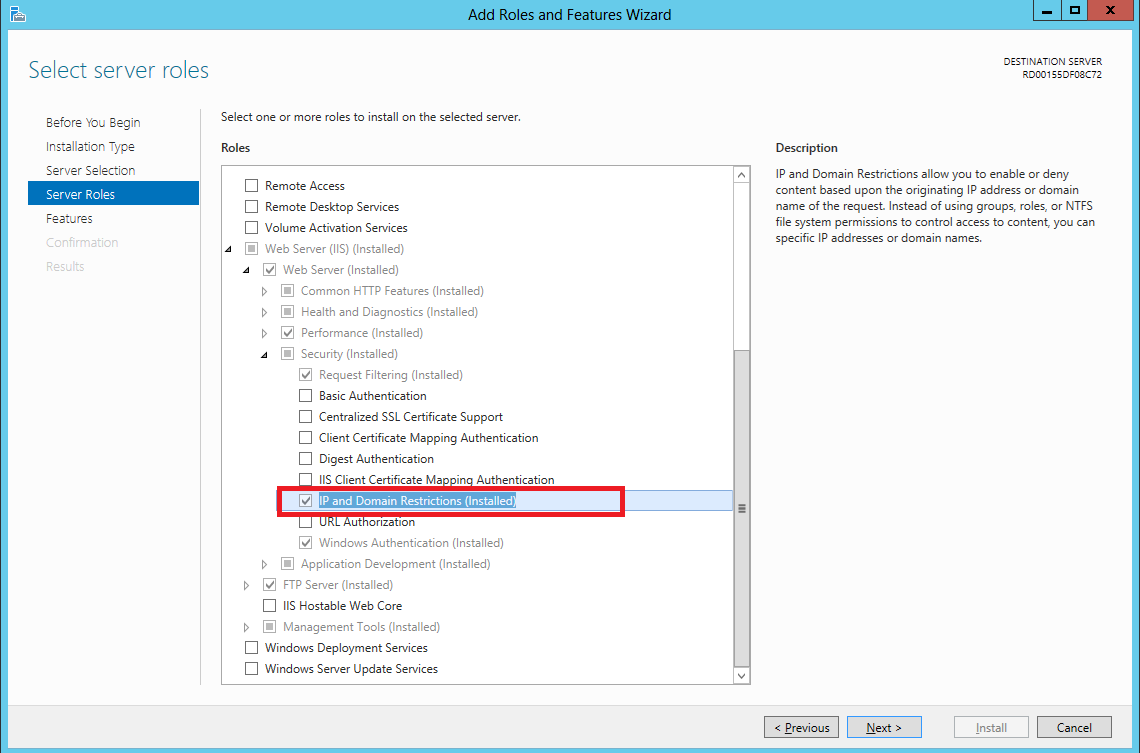
    剩下的一成就是要看IIS有沒有開啟IP 位址及網域限制(IP Address and Domain Restrictions)功能

    前幾天因為Server沒有安裝所以卡在這裡(Windows Azure 遠端桌面設定)

    沒有開啟的話,請到開啟或關閉Windows功能去設定

    以上2個動作就完成限制IP連線了


    參考:
    Web.config ipSecurity
    IP Security <ipsecurity>

    ASP.NET MVC 4 WebApi 與 Extjs 的結合 -- 換頁重新載入資料

    在 Web Form 做 Grid 換頁時,通常會先將資料把所有資料先建入 DataTable,再使用控制項接收這些資料,換頁時,就將這些資料經過處理再顯示。然後再做資料搜尋,會再去要一次資料,如此一來,在每次產生 GridView 時,都會使用同一份資料篩選,等於是網頁上有一份資料在做處理,如果資料量一大,吃的資源也大,處理與顯示時相對的就慢。

    使用 Extjs 做 Grid.Panel 分頁,一般來說會先將所有資料載到頁面,再做分頁,只是 Extjs 接收資料格式必須要在最根層加上總數量,這樣才能知道該頁顯示幾頁,總共有幾頁,所以格式必須符合如下:
    {
        "totalCount": "6679",
        "topics": [
        {
            // ....
        },
        {
            // ....
        },
        {
            // ....
        },
        {
            // ....
        },
        {
            // ....
        }
        // ...
        ]
    }
    

    而符合這種格式必須在 Web Api 段做些許調整,要多寫一個屬性讓 API 能使用,可以參考:Web API, OData, $inlinecount and testing,程式碼如下

    public class InlineCountQueryableAttribute : QueryableAttribute
    {
        private static MethodInfo _createPageResult =
            typeof(InlineCountQueryableAttribute)
            .GetMethods(BindingFlags.Static | BindingFlags.NonPublic)
            .Single(m => m.Name == "CreatePageResult");
    
        public override void OnActionExecuted(HttpActionExecutedContext actionExecutedContext)
        {
            base.OnActionExecuted(actionExecutedContext);
    
            HttpRequestMessage request = actionExecutedContext.Request;
            HttpResponseMessage response = actionExecutedContext.Response;
    
            IQueryable result;
            if (response.IsSuccessStatusCode
                && response.TryGetContentValue<IQueryable>(out result))
            {
                long? inlineCount = request.GetInlineCount();
                if (inlineCount != null)
                {
                    actionExecutedContext.Response = _createPageResult.MakeGenericMethod(result.ElementType).Invoke(
                        null, new object[] { request, request.GetInlineCount(), request.GetNextPageLink(), result }) as HttpResponseMessage;
                }
            }
        }
    
        internal static HttpResponseMessage CreatePageResult<T>(HttpRequestMessage request, long? count, Uri nextpageLink, IEnumerable<T> results)
        {
            return request.CreateResponse(HttpStatusCode.OK, new PageResult<T>(results, nextpageLink, count));
        }
    }
    

    在 API 加上此屬性:
    [InlineCountQueryable]
    public IEnumerable GetEmployees()
    {
        IEnumerable employees = db.Employees.ToList();
    
        foreach (Employees employee in employees)
        {
            employee.Employees1 = null;
            employee.Employees2 = null;
        }
    
        return employees;
    }
    

    執行結果如下:
    { 
        Count: 15,
        Items: [
            { ... }, 
            { ... }, 
            ...
        ],
        NextPageLink: XXX,
    }
    

    這樣輸出結果與 Extjs Grid.Panel 做分頁要接收的格式已經 95% 相似了,而換頁時通常自動會帶 page 、 start 和 limit,page 感覺只是顯示用,而 start 和 limit 的部分可以使用 API 的 Queryable 來解決,它等同於 Queryable 的 $skip 和 $top:

    首先我們先看如何在 grid.Panel 加上分頁,加上一個屬性即可,其中 store 為資料來源:
    bbar: Ext.create('Ext.PagingToolbar', {
        store: store,
        displayInfo: true,
        displayMsg: 'Displaying topics {0} - {1} of {2}',
        emptyMsg: "No topics to display",
    }),
    

    因為每一次換頁就會與 store 要一次資料,所以必須針對來源做修改:
    var store = Ext.create('Ext.data.JsonStore', {
        storeId: 'store',
        model: 'Model',
        pageSize: 3,
        
        proxy: {
            type: 'ajax',
            url: 'http://localhost:8090/api/Control?$inlinecount=allpages',
            reader: {
                type: 'json',
                root: 'Items',
                totalProperty: 'Count',
    
            },
            startParam: '$skip',
            limitParam: '$top'
        },
        autoLoad: true,
        listeners: {
            load: function (store, records, options) {
            }
        },
    
    });
    

    其中 PageSize 為每頁顯示數量,而 startParam、limitParam 則是改變它換頁帶的參數,最後執行就可以看到每換一次頁就會重新與 API 要一次資料,這樣一來頁面負擔不會太重,同時又做到速度與流量兼顧的結果。


    2014年4月29日 星期二

    Windows Azure 遠端桌面設定+遠端掛載本機磁碟

    相信大家都遇過本機(或測試Server)Run的程式一切正常(完美),但是一上到正式(或其他)Server就一堆問題,絕大多數是因為有些東西沒有設定好(這邊指的是Server上的一些設定)

    最近使用Windows Azure建立雲端服務(Cloud Service),為了限制IP使用,在Web.config設定允許IP列表,本機、同事的電腦...等等測試一切正常,但是一上到Azure就完全無效

    因為也是最近才接觸Azure,只用過入口網站跟VS進行設定跟上傳,一直有個疑惑,微軟不可能鎖死Server設定(一定被罵翻),因為太多狀況了,也不可能全部開放,但是遠端桌面及一些Server設定應該是可以才對,花了一些時間終於找到了方法

    首先要先設定連線的帳號密碼


    然後會開出設定遠端桌面,這時候敲入使用者名稱、密碼、到期日

    接著將Azure設定好的遠端連線(rdp)檔下載下來

    帳號已經幫你預設好了,敲入密碼就可以連線進去了


    參考:
    微軟Azure測試心得分享(四) :啟用Virtual Machine (中)
    遠端連線至 Windows Azure 雲端服務


    補充:
    透過VS去上傳專案,真的是有夠慢的,只更新DLL也要傳個老半天,雲端服務又不支援FTP,也不想安裝(或自己開發)檔案傳輸工具,透過David Kuo的協助,原來可以透過遠端桌面掛載本機磁碟的方式達到網路硬碟的功效

    利用Azure下載的遠端桌面檔,設定要分享的本機磁碟

    進入後就可以在檔案總管看到我們分享進來的本機磁碟

    這樣傳檔案就真的方便多了

    參考:
    遠端桌面本機與遠端檔案互傳 (MS AZURE 適用)

    2014年4月21日 星期一

    GData APIs ( Google Data APIs ) - Calendar

    個人通常記錄未來工作事項都是習慣使用紙本記錄,因為好處是隨身、任意塗改、做不止文字的記錄,但我相信還是有更多的人較喜歡使用 Google 日曆,除了可以記錄工作事項外,且可將事項分類、重要性、附檔、結合 Gmail....等好處多多 ( 請參閱: Google日曆 最佳化:在忙碌瑣事中有效率掌握最重要行程)。

    此篇文章只提供重要程式碼,去使用 C# Windows Form 來建置一個視窗程式與 Google 日曆互動。

    未下載 GData APIs 且未安裝請參考:GData APIs ( Google Data APIs ) 介紹與安裝

    引用參考

    using Google.GData.Calendar;
    using Google.GData.Client;
    using Google.GData.Extensions;
    

    建立 CalendarService

    service = new CalendarService(projectid);
    service.setUserCredentials(username, password);
    

    若無 projectid,請到 Google Developers Console 申請。

    取得 使用者 所有日曆

    public void GetUserCalendars()
    {
        FeedQuery query = new FeedQuery();
        query.Uri = new Uri("http://www.google.com/calendar/feeds/default");
    
        AtomFeed calFeed = service.Query(query);
    
        for (int i = 0; i < calFeed.Entries.Count; i++)
        {
            // Console.WriteLine(calFeed.Entries[i].Title.Text);
            // do something ...
        }
    }
    

    取得所有日曆事件

    public AtomEntryCollection GetAllEvents()
    {
        EventQuery myQuery = new EventQuery(calendarURI);
        EventFeed myResultsFeed = service.Query(myQuery) as EventFeed;
    
        entries = myResultsFeed.Entries;
    
        return entries;
    }
    
    calendarURI 為 https://www.google.com/calendar/feeds/default/private/full。

    取得日曆 日期區間 事件

    public AtomEntryCollection GetDateRangeEvents(DateTime startTime, DateTime endTime)
    {
        EventQuery myQuery = new EventQuery(calendarURI);
        myQuery.StartTime = startTime;
        myQuery.EndTime = endTime;
    
        EventFeed myResultsFeed = service.Query(myQuery) as EventFeed;
    
        entries = myResultsFeed.Entries;
    
        return entries;
    }
    

    建立事件

    public void CreateEvent(string title, string content, DateTime dtStart, DateTime dtEnd)
    {
        EventEntry entry = new EventEntry();
    
        entry.Title.Text = title;
        entry.Content.Content = content;
    
        When eventTime = new When(dtStart, dtEnd);
        entry.Times.Add(eventTime);
    
        Uri postUri = new Uri(calendarURI);
    
        AtomEntry insertedEntry = service.Insert(postUri, entry);
    
    }
    

    更新事件

    public void UpdateEvent(EventEntry entry)
    {
        Uri postUri = new Uri(calendarURI);
    
        AtomEntry insertedEntry = service.Update(entry);
    
    }

    實作

    我用以上幾個函式寫了一個視窗程式,下圖為成品


    2014年4月13日 星期日

    GData APIs ( Google Data APIs ) - Blogger

    現在大部分的部落格都已經開放 API 讓開發人員能使用 API 對部落格做 CRUD 的動作,痞克邦、隨意窩、Blogger,甚至包括之前關站的無名小站皆有提供,接下來就開始使用 C# 來撰寫使用 Blogger 的程式。

    有許多人都使用 webBrowser 來模擬瀏覽器的動作發布文章,但是 blogger 無法讓你這樣做,你可以試試看,保證你抓不到 tag。

    未下載 GData APIs 且未安裝請參考:GData APIs ( Google Data APIs ) 介紹與安裝

    引用參考

    使用 Google.GData.Client.dll 。
    using Google.GData.Client;
    

    建立 Service

    username 為帳號 ( Email ),password 為密碼,若帳號有設置兩步驗證的話,請到 應用程式專用密碼 去取得一組密碼,要不然原本帳號密碼是無法使用。
    service = new Service("blogger", "blogger-example");
    service.Credentials = new GDataCredentials(username, password);
    

    取得文章列表

    max-results 為參數,讓回傳的文章數最大為 500 篇。
    /* 列出使用者的部落格 */
    public Dictionary<string, Uri> GetListUserBlogs()
    {
        Dictionary<string, Uri> dicBlogs = new Dictionary<string,Uri>();
    
        FeedQuery query = new FeedQuery();
        query.Uri = new Uri("http://www.blogger.com/feeds/default/blogs");
        AtomFeed feed = service.Query(query);
    
        // 發佈文章
        Uri blogPostUri = null;
    
    
        if (feed != null)
        {
            foreach (AtomEntry entry in feed.Entries)
            {
                
                for (int i = 0; i < entry.Links.Count; i++)
                {
                    if (entry.Links[i].Rel.Equals("http://schemas.google.com/g/2005#post"))
                    {
                        blogPostUri = new Uri(entry.Links[i].HRef.ToString() + "?max-results=500");
                        dicBlogs.Add(entry.Title.Text, blogPostUri);
                        
                    }
                }
                // return blogPostUri;
                
            }
        }
        return dicBlogs;
    }
    

    新增文章

    其中 tags 變數為逗點分隔的字串,isDraft 為是否為草稿。
    /* 建立新文章且將它送到 blogPostUri */
    public AtomEntry CreatePost(Uri blogPostUri, string title, string content, string tags, DateTime dt, bool isDraft)
    {
        AtomEntry createdEntry = null;
        if (blogPostUri != null)
        {
            // construct the new entry
            AtomEntry newPost = new AtomEntry();
            newPost.Title.Text = title;
            newPost.Content = new AtomContent();
            newPost.Content.Content = content;
    
            foreach (string term in tags.Split(new string[] { "," }, StringSplitOptions.RemoveEmptyEntries))
                newPost.Categories.Add(new AtomCategory(term, new AtomUri("http://www.blogger.com/atom/ns#")));
    
            newPost.Published = dt;
            newPost.IsDraft = isDraft;
    
            createdEntry = service.Insert(blogPostUri, newPost);
            if (createdEntry != null)
            {
                Console.WriteLine("  New blog post created with title: " + createdEntry.Title.Text);
            }
        }
        return createdEntry;
    }
    

    更新文章


    /* 編輯文章 */
    public void EditEntry(AtomEntry toEdit)
    {
        if (toEdit != null)
        {
            // toEdit.Title.Text = "Marriage Woes!";
            toEdit = toEdit.Update();
        }
    }
    

    刪除文章


    /* 刪除文章 */
    public void DeleteEntry(AtomEntry toDelete)
    {
        if (toDelete != null)
        {
            toDelete.Delete();
        }
    }
    

    實作

    我用以上幾個函式寫了一個視窗程式,下圖為成品